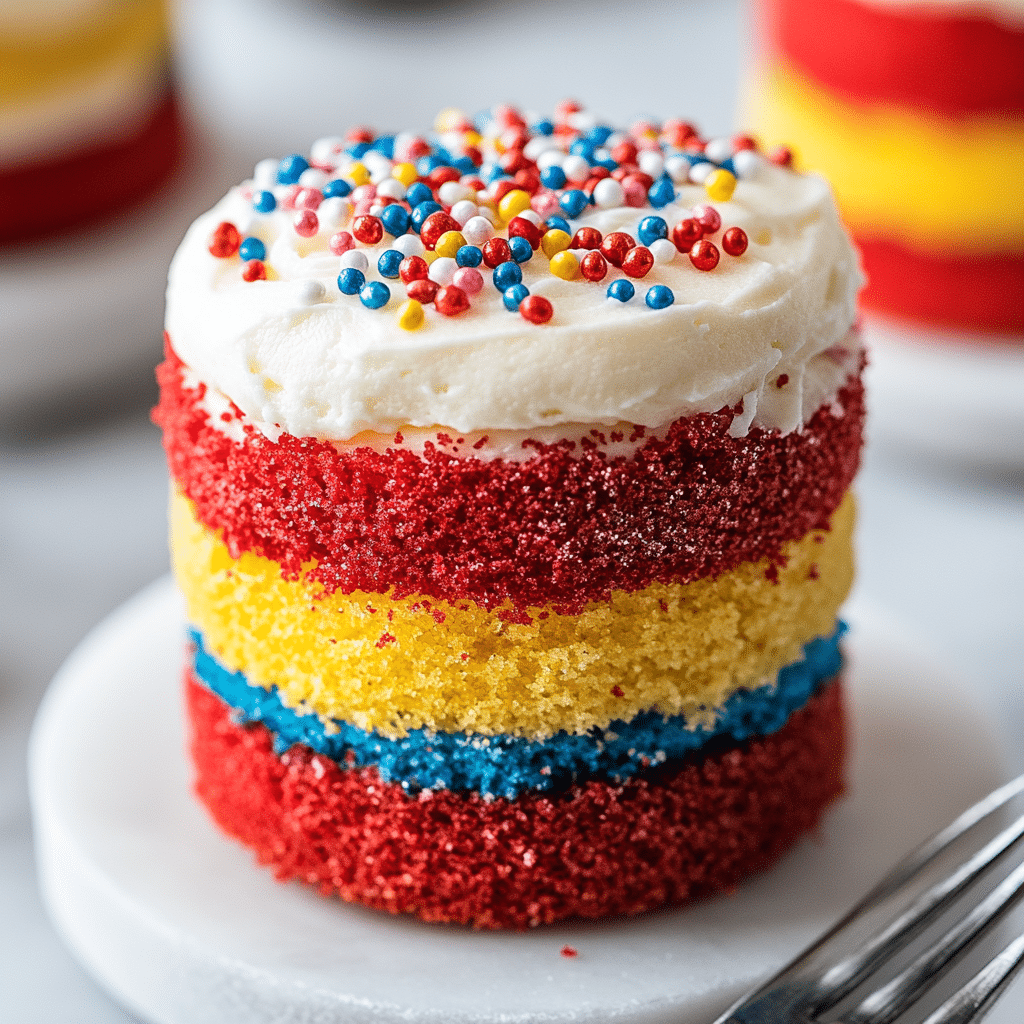
These festive Red, White, and Blue Mini Cakes are an absolute showstopper — adorable, delicious, and surprisingly simple to make. Perfect for patriotic holidays like the Fourth of July, Memorial Day, or any summer celebration, they combine moist vanilla cake layers with vibrant pops of red and blue, all wrapped up in a creamy, dreamy frosting. And the best part? They’re individual-sized, so everyone gets their own little masterpiece!
Why You’ll Love This Recipe
- Perfect for Celebrations: These mini cakes are ideal for patriotic holidays or birthday parties, bringing festive flair and fun to any dessert table.
- Easy to Customize: You can keep things simple with classic vanilla, or jazz them up with different flavors and fillings.
- Quick to Make: You can bake the layers ahead of time, and assembly takes just minutes — great for when you’re short on time.
- Crowd-Pleaser: Everyone loves their own personal dessert, and these are as delicious as they are beautiful.
Ingredients You’ll Need

Here’s what you’ll need to create these festive mini treats — and every ingredient has its special role:
- All-Purpose Flour: Provides the structure for a fluffy, tender crumb.
- Granulated Sugar: Sweetens the cake and helps with that golden-brown finish.
- Baking Powder: Gives the mini cakes a light, airy lift.
- Salt: Just a pinch enhances the overall flavor — don’t skip it.
- Unsalted Butter: Adds richness and that melt-in-your-mouth texture.
- Eggs: Essential for binding and structure.
- Milk: Keeps the cake moist and smooth.
- Vanilla Extract: Gives the cakes a warm, sweet flavor base.
- Red and Blue Food Coloring: The stars of the show! Gel food coloring works best for vibrant tones without thinning the batter.
- Whipped Cream or Buttercream Frosting: For filling and decorating — choose your favorite!
- Fresh Berries (optional): Strawberries, raspberries, and blueberries are perfect for topping.
Variations
There’s a lot of room to play with this recipe:
- Flavor Twist: Add lemon zest or almond extract to the batter for a subtle, refreshing twist.
- Frosting Fun: Use cream cheese frosting for a tangy complement, or keep it light with stabilized whipped cream.
- Filled Mini Cakes: Add a layer of fruit preserves or fresh berry compote between the layers for extra wow.
- Chocolate Fans: Swirl in some white chocolate chips or drizzle the top with a white chocolate ganache.
How to Make Red, White, and Blue Mini Cakes
Step 1: Make the Cake Batter
Start by preheating your oven to 350°F. Grease a large sheet cake pan or line it with parchment paper. Prepare your vanilla cake batter using your favorite recipe or a reliable box mix — just make sure it’s light in color.
Step 2: Divide and Color
Once your batter is ready, divide it evenly into three bowls. Leave one as is (white), then color the other two with red and blue food coloring. Stir each one thoroughly to get rich, even tones.
Step 3: Bake the Layers
Pour each colored batter into its own pan (or bake them one at a time if you only have one pan). Spread each batter thinly so they bake up quickly and evenly. Bake until a toothpick comes out clean — usually around 12–15 minutes.
Step 4: Cut Out the Layers
Once the layers are cool, use a round cookie cutter or a drinking glass to cut out small cake circles. You’ll need three circles per mini cake — one red, one white, and one blue.
Step 5: Assemble
Layer the mini cakes by stacking red, white, and blue rounds with frosting in between. You can use a piping bag for neatness or just spread it gently with a knife.
Step 6: Decorate
Top each mini cake with a swirl of frosting and fresh berries if desired. You can also add festive sprinkles for extra fun!
Pro Tips for Making the Recipe
- Use Gel Food Coloring: It gives intense color without watering down the batter.
- Chill the Cake Layers: Cold cake is easier to cut neatly — pop them in the fridge for 30 minutes before cutting.
- Keep the Layers Even: Use an offset spatula to spread the batter evenly before baking so each layer cooks uniformly.
- Use a Serrated Knife for Trimming: If the tops dome a bit, gently level them off for prettier stacking.
How to Serve
These mini cakes are a dessert and a decoration all in one. Serve them on a big platter with patriotic-themed napkins or dessert plates. If you’re hosting a party, arrange them on a tiered cake stand — they look stunning and elegant.
Pair them with:
- Sparkling Lemonade or Berry Iced Tea: Refreshing drinks that match the fruity vibe.
- Vanilla Ice Cream: A scoop on the side turns this into an indulgent treat.
- Fresh Berry Salad: Light and sweet, it complements the cakes perfectly.
Make Ahead and Storage
Storing Leftovers
Store assembled mini cakes in the fridge in an airtight container. They’ll stay fresh for up to 3 days. Let them sit at room temperature for about 15 minutes before serving.
Freezing
You can freeze the cake layers (before frosting) for up to 2 months. Wrap tightly in plastic and store flat. Thaw in the fridge before assembling.
Reheating
No need to reheat — they’re best served cold or at room temperature. If using frozen layers, bring them to room temp before frosting.
FAQs
Can I use a cake mix for this recipe?
Absolutely! A quality vanilla or white cake mix works beautifully here. Just be sure to follow the package instructions and add the food coloring evenly.
What size cutter should I use for the mini cakes?
A 2.5 to 3-inch round cutter works best. It makes the perfect individual serving without being too big or too tiny.
Can I make these gluten-free?
Yes! Simply swap in your favorite gluten-free flour blend and make sure your other ingredients (especially frosting) are gluten-free too.
How far in advance can I assemble these?
You can assemble them up to a day in advance. Keep them covered in the fridge and decorate with fresh berries just before serving for the best look and flavor.
Final Thoughts
These Red, White, and Blue Mini Cakes are more than just festive—they’re fun, delicious, and totally doable even on a busy day. Whether you’re celebrating with friends, family, or just treating yourself, these colorful little cakes bring joy to the table. Try them out, get creative, and let your inner baker shine!
Print
Red, White, and Blue Mini Cakes Recipe
- Prep Time: 30 minutes
- Cook Time: 20 minutes
- Total Time: 50 minutes
- Yield: 12 mini cakes 1x
- Category: Dessert
- Method: Baking
- Cuisine: American
- Diet: Vegetarian
Description
These festive Red, White, and Blue Mini Cakes are perfect for patriotic celebrations like the Fourth of July. Made with layers of colorful sponge cake and topped with whipped cream and berries, they’re a sweet treat that’s as eye-catching as it is delicious.
Ingredients
- 1 box white cake mix
- 1 cup water
- 1/3 cup vegetable oil
- 3 large eggs
- Red food coloring
- Blue food coloring
- 1 cup heavy whipping cream
- 2 tbsp powdered sugar
- 1 tsp vanilla extract
- 1/2 cup sliced strawberries
- 1/2 cup blueberries
Instructions
- Preheat oven to 350°F (175°C). Grease and flour three 8-inch round cake pans.
- Prepare the cake mix according to the package instructions using water, oil, and eggs.
- Divide the batter into three equal parts. Leave one white, color one with red food coloring, and the other with blue food coloring.
- Pour each colored batter into separate pans and bake for 15-20 minutes or until a toothpick comes out clean. Let cool completely.
- Using a round cookie cutter, cut small circles out of each cake layer.
- Whip the heavy cream with powdered sugar and vanilla extract until stiff peaks form.
- Layer the mini cakes by stacking red, white, and blue cake circles with whipped cream between each layer.
- Top with additional whipped cream and decorate with strawberries and blueberries.
- Chill in the refrigerator until ready to serve.
Notes
- You can make the cake layers a day ahead and store them in the fridge.
- Use gel food coloring for more vibrant colors.
- Optional: Add a touch of lemon zest to the whipped cream for extra flavor.
Nutrition
- Serving Size: 1 mini cake
- Calories: 210
- Sugar: 18g
- Sodium: 170mg
- Fat: 10g
- Saturated Fat: 4g
- Unsaturated Fat: 5g
- Trans Fat: 0g
- Carbohydrates: 28g
- Fiber: 1g
- Protein: 2g
- Cholesterol: 35mg
Your email address will not be published. Required fields are marked *