If you’re on the lookout for a dessert that feels like a warm hug in every bite, look no further than this No-Bake Chocolate Peanut Butter Bars Recipe. This family favorite treat brings together the irresistible creaminess of peanut butter with the rich indulgence of chocolate, all without turning on the oven. It’s the perfect blend of crunchy, sweet, and smooth textures wrapped up in one delightful bar that’s sure to please both kids and adults alike. Whether you’re craving an easy dessert or a snack to share, these bars deliver comfort and flavor in every square.
Ingredients You’ll Need
Each ingredient in this recipe plays a special role in creating those perfectly balanced flavors and textures. From the buttery base to the luscious chocolate topping, these simple staples come together to make magic happen.
- 1 cup unsalted butter, melted: Adds richness and helps bind the base together with a smooth, creamy texture.
- 2 cups graham cracker crumbs: Provides a buttery, slightly sweet crunch for the foundation of the bars.
- 2 cups powdered sugar: Sweetens the base while keeping it velvety and free of grainy texture.
- 1 cup creamy peanut butter: Imparts deep, nutty flavor and creaminess to the bar’s core.
- 1 ½ cups semi-sweet chocolate chips: Creates the glossy, decadent chocolate topping that contrasts perfectly with the peanut butter.
- ¼ cup peanut butter (for topping layer): Enriches and softens the chocolate layer, enhancing that signature peanut butter flavor.
How to Make No-Bake Chocolate Peanut Butter Bars Recipe
Step 1: Prepare the Peanut Butter Base
Start by mixing the melted butter, graham cracker crumbs, powdered sugar, and 1 cup of creamy peanut butter in a large bowl. Use a sturdy spoon or spatula to combine everything until the mixture is smooth and evenly blended—it should look thick but spreadable. This mixture forms the tasty, crumbly base of your bars and sets the stage for the chocolatey goodness to come.
Step 2: Press the Base Into the Pan
Line a 9×13-inch baking dish with parchment paper or lightly grease it to prevent sticking. Press the peanut butter mixture firmly and evenly into the bottom. Don’t be shy here—a nice compact layer will hold together better when you cut the bars later, ensuring those neat, satisfying squares everyone loves.
Step 3: Melt the Chocolate Topping
In a microwave-safe bowl, combine the semi-sweet chocolate chips and ¼ cup peanut butter. Heat them in 30-second intervals, stirring well after each to encourage smooth melting and prevent burning. When fully melted and glossy, your topping is ready to take these bars to the next level of indulgence.
Step 4: Spread the Chocolate Over the Base
Pour the luscious chocolate and peanut butter mixture evenly over the pressed base. Use a spatula to smooth it out into a shiny, even layer. This step is where the perfect balance of chocolate and peanut butter shine through, creating the signature look and flavor of this No-Bake Chocolate Peanut Butter Bars Recipe.
Step 5: Chill and Set
Pop the baking dish into the refrigerator and let the bars chill for at least 2 hours. This gives the layers time to firm up so you can easily slice them into perfect bars. When set, your delicious no-bake treat is ready to be enjoyed—either straight from the fridge or at room temperature.
How to Serve No-Bake Chocolate Peanut Butter Bars Recipe
Garnishes
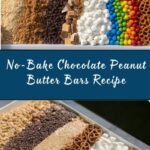
Want to jazz up your bars for a party or special occasion? Sprinkle crushed pretzels or a pinch of flaky sea salt on top before the chocolate hardens. These garnishes add an exciting salty crunch and make each bite even more exciting. You can also sprinkle mini chocolate chips or chopped peanuts for added texture and visual appeal.
Side Dishes
These bars pair wonderfully with a cold glass of milk for a classic combo, or a cup of hot coffee or tea when you want a cozy afternoon treat. They also hold their own alongside fresh fruit like sliced bananas or strawberries to balance sweetness with a bit of freshness.
Creative Ways to Present
Cut the bars into fun shapes using cookie cutters for themed gatherings or package individual squares in small cellophane bags tied with ribbon as homemade gifts. For an extra special touch, layer crushed bars over ice cream sundaes or crumble them over yogurt parfaits to add delightful crunch and flavor.
Make Ahead and Storage
Storing Leftovers
One of the greatest perks of this No-Bake Chocolate Peanut Butter Bars Recipe is how well it stores. Keep leftovers in an airtight container in the refrigerator to maintain freshness and texture. They will stay delicious for up to one week—perfect for making ahead when you have guests or want a quick snack at your fingertips.
Freezing
If you want to extend the life of these bars, freezing is a fantastic option. Wrap individual bars tightly in plastic wrap and place them in a freezer-safe container. They freeze beautifully for up to 3 months. When ready to enjoy, thaw them overnight in the fridge for the best texture.
Reheating
Since these bars are best served chilled or room temperature, reheating isn’t necessary. However, if you prefer a warmer treat, allow the bar to come to room temperature or heat for just a few seconds in the microwave—be mindful not to overheat or the layers can separate.
FAQs
Can I use crunchy peanut butter instead of creamy?
Absolutely! Crunchy peanut butter adds a delightful texture to the base, giving each bite a bit of extra nuttiness and crunch. Just be sure to mix well so the texture is evenly distributed throughout the bars.
Do these bars need refrigeration at all times?
Refrigeration is recommended to keep the bars firm and prevent the chocolate topping from melting, especially on warm days. They can be served at room temperature if your kitchen is cool, but refrigeration helps maintain their perfect texture.
Can I substitute graham cracker crumbs with something else?
Sure! Crushed digestive biscuits or vanilla wafers make excellent alternatives if graham crackers aren’t available. Just use the same quantity, and your bars will still have that lovely sweet-crunchy base.
Is this recipe nut-free if I use peanut butter alternatives?
This recipe specifically relies on peanut butter’s flavor, so substituting with a sunflower seed butter or other nut-free butter can work for those with allergies. The texture might slightly vary, but the bars will still be scrumptious and safe for nut-free diets.
Can I make these bars vegan?
To make a vegan version, swap the butter with a dairy-free alternative, and choose dairy-free chocolate chips. Ensure the powdered sugar is vegan-friendly as well. These simple swaps keep the recipe both delicious and plant-based.
Final Thoughts
There is something truly comforting about this No-Bake Chocolate Peanut Butter Bars Recipe that makes it a beloved family favorite treat for good reason. It combines simplicity with indulgence, taking just minutes to prepare but delivering flavor that feels like a treat from an old-fashioned bakery. Whether you’re new to no-bake desserts or looking to add a new classic to your recipe collection, these bars are a wonderful choice. Go ahead, give them a try—you might just find your new go-to dessert for every occasion!
Print
No-Bake Chocolate Peanut Butter Bars Recipe
- Prep Time: 15 minutes
- Cook Time: 0 minutes
- Total Time: 2 hours 15 minutes
- Yield: 24 bars
- Category: Dessert, Snack
- Method: No-Cook
- Cuisine: American
- Diet: Vegetarian
Description
A Family Favorite Treat – No-Bake Chocolate Peanut Butter Bars are a simple and delicious dessert that combines the creamy richness of peanut butter with the sweet, smooth chocolate topping. These bars require no baking and come together quickly, making them perfect for an easy treat or snack that can be prepared ahead of time and stored in the fridge or freezer.
Ingredients
Base Layer
- 1 cup unsalted butter, melted
- 2 cups graham cracker crumbs
- 2 cups powdered sugar
- 1 cup creamy peanut butter
Topping Layer
- 1 ½ cups semi-sweet chocolate chips
- ¼ cup peanut butter
Instructions
- Prepare the Base Mixture: In a large bowl, combine the melted butter, graham cracker crumbs, powdered sugar, and 1 cup of creamy peanut butter. Mix thoroughly until all ingredients are well incorporated into a smooth, crumbly mixture.
- Press into Baking Dish: Line a 9×13-inch baking dish with parchment paper or lightly grease it. Evenly press the peanut butter mixture firmly into the bottom of the dish to create a uniform layer.
- Melt Chocolate Topping: In a microwave-safe bowl, add the chocolate chips and ¼ cup peanut butter. Heat in 30-second intervals, stirring after each, until the mixture is completely melted and smooth without lumps.
- Assemble the Bars: Pour the melted chocolate and peanut butter mixture over the base layer in the pan. Spread it evenly using a spatula to cover the peanut butter base completely.
- Chill to Set: Place the assembled bars in the refrigerator and chill for at least 2 hours or until completely set and firm.
- Serve: Once set, remove the bars from the baking dish using the parchment paper edges. Cut into 24 equal squares and serve chilled or at room temperature.
Notes
- These bars are rich and satisfying, making them a perfect indulgent treat.
- They are freezer-friendly; store them in an airtight container for longer preservation.
- For added texture and flavor, try sprinkling crushed pretzels or a pinch of sea salt on top before chilling.

