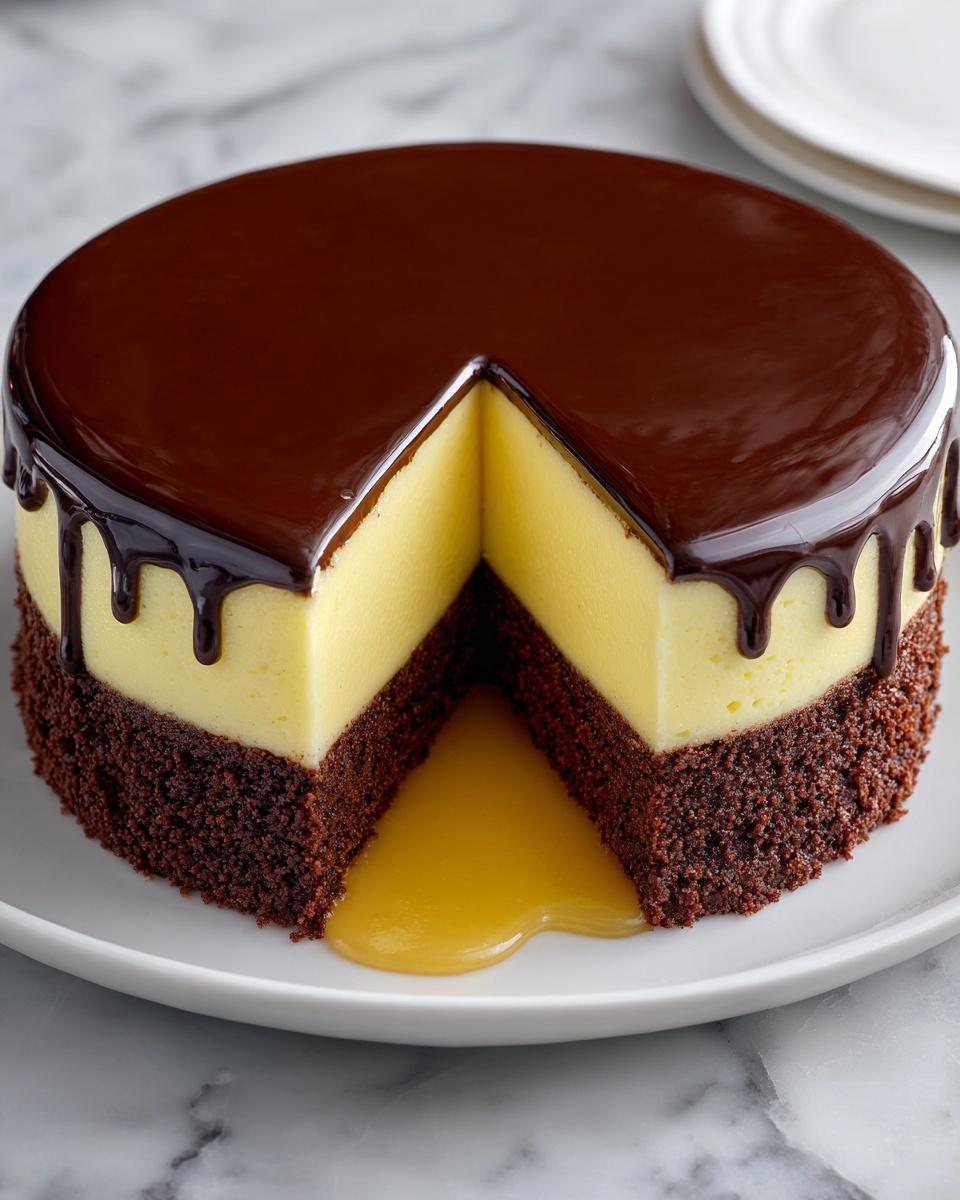
If you have a sweet tooth and love desserts that combine creamy richness with a touch of chocolate magic, then the Magic Melt Chocoflan Recipe is about to become your new obsession. This extraordinary dessert brings together a luscious flan layer and a moist, chocolatey cake, all topped with a glorious caramel cajeta glaze. Once you try this recipe, you’ll understand why it’s called “magic melt” because the textures melt into one another perfectly, creating a dreamy experience in every bite that will impress anyone lucky enough to share it with you.
Ingredients You’ll Need
These ingredients are the heart and soul of the Magic Melt Chocoflan Recipe. Each item plays a crucial role, whether adding creamy texture, deep chocolate flavor, or that signature sweet caramel finish. Don’t underestimate the power of good quality vanilla or fresh buttermilk here—they truly elevate the final dish.
- 14 ounces sweetened condensed milk: The base of the flan, providing rich sweetness and creamy consistency.
- 12 ounces evaporated milk: Adds a velvety texture without extra sweetness, balancing the condensed milk.
- 4 ounces cream cheese, softened: Gives the flan a smooth and slightly tangy depth.
- 3 large eggs: Essential for stability and structure in the flan layer.
- 4 teaspoons vanilla extract (Mexican if possible): Infuses the flan with warm, aromatic notes.
- 10 tablespoons unsalted butter, softened: Creates the fluffy chocolate cake base and enriches flavor.
- 1 cup granulated sugar: Sweetens and helps create a light, tender crumb in the cake.
- 1 large egg: Adds moisture and structure to the cake.
- 1¾ cups all-purpose flour: The foundation of the cake’s body.
- ½ cup unsweetened cocoa powder: Packs the deep chocolate flavor needed to contrast with the sweet flan.
- 1 tablespoon ground cinnamon: Adds a subtle warmth that enhances the chocolate.
- 1 teaspoon baking powder: Helps the cake rise and stay light.
- ¾ teaspoon baking soda: Works with the buttermilk to leaven the cake.
- 1¼ cups buttermilk: Brings tenderness and slight tang to balance sweetness.
- 2 tablespoons softened butter (for greasing): Ensures the dessert releases cleanly from the pan.
- ¼ cup cajeta (caramel sauce): Creates an irresistible caramel layer that marries the entire dessert.
How to Make Magic Melt Chocoflan Recipe
Step 1: Prepare Your Pan
Preheat your oven to 350°F (175°C) and start by greasing your baking pan thoroughly with softened butter. This step is crucial because the cajeta, which you’ll pour next, needs a non-stick surface to create that beautiful caramel layer that finishes the chocoflan. Pour the cajeta evenly into the bottom of the pan, spreading it out gently but completely.
Step 2: Whip Up the Flan Mixture
In a blender or with a mixer, combine the sweetened condensed milk, evaporated milk, softened cream cheese, three large eggs, and vanilla extract. Blend these ingredients until you get a perfectly smooth and homogenous custard mixture. This silky flan component is going to sink to the bottom during baking, so the blending ensures it sets beautifully.
Step 3: Make the Chocolate Cake Batter
Begin by creaming together the softened butter and granulated sugar until the mixture is light and fluffy—this is where your cake gets its tender crumb. Beat in the remaining large egg to bind everything. In a separate bowl, sift together the flour, cocoa powder, cinnamon, baking powder, and baking soda to evenly distribute the dry ingredients.
Step 4: Combine Dry and Wet Ingredients
Now, add the dry ingredients alternately with the buttermilk to the creamed butter and sugar mixture. Start and end with the dry ingredients, mixing gently after each addition. This careful combination helps keep the batter light and airy while infusing the cake with a rich chocolate and cinnamon flavor.
Step 5: Assemble the Layers in the Pan
Pour the chocolate cake batter on top of the cajeta layer you prepared earlier in the pan. Once the cake batter is spread out, carefully pour the flan mixture over the top. Don’t worry that it seems to float—the magic is that this flan layer will sink beneath the cake during baking, creating the iconic chocoflan layering effect.
Step 6: Bake Using a Water Bath
Place your pan inside a larger baking dish and pour in about an inch of hot water to create a water bath. This step ensures gentle, even cooking so the flan sets perfectly while the cake bakes without cracking. Bake for 1 hour to 1 hour and 15 minutes or until the flan feels set to the touch and a toothpick inserted into the cake comes out clean.
Step 7: Cool and Chill Before Serving
Once out of the oven, allow your chocoflan to cool completely at room temperature. Then transfer it to the fridge for at least 4 hours—or better yet, overnight—to fully chill and firm up the layers. When ready, run a knife around the edges, then invert onto a serving plate to reveal the gorgeous, glossy caramel top and the perfect layers beneath.
How to Serve Magic Melt Chocoflan Recipe
Garnishes
To elevate the presentation and add extra flavor, consider garnishing your chocoflan with a sprinkle of finely chopped toasted pecans or almonds for crunch. Fresh berries like raspberries or strawberries also add a pop of color and a bright tartness that cuts through the sweetness beautifully. A light dusting of powdered sugar can add a delicate finish as well.
Side Dishes
This dessert shines on its own, but if you’re looking to serve a complete treat, consider pairing it with a scoop of vanilla bean ice cream or a dollop of freshly whipped cream. The cold and creamy sides contrast wonderfully with the warm spices and caramelized notes of the chocoflan. For a sophisticated twist, a cup of rich coffee or spiced hot chocolate pairs like a dream.
Creative Ways to Present
If you want to impress guests, serve your Magic Melt Chocoflan Recipe in individual portions using small ramekins or muffin tins lined with parchment. This not only makes serving easier but also provides a charming personal treat. You can also drizzle a little extra cajeta or caramel sauce over each slice and garnish with edible flowers for a stunning showstopper.
Make Ahead and Storage
Storing Leftovers
Leftover chocoflan keeps beautifully in the refrigerator when covered tightly with plastic wrap or stored in an airtight container. It maintains its flavor and texture for up to 4 days, making it perfect for meal prep or post-party treats.
Freezing
You can freeze portions of this dessert for longer storage. Wrap individual slices well in plastic wrap and foil to protect from freezer burn. Thaw in the refrigerator overnight before serving to preserve the creamy texture of the flan and moistness of the cake.
Reheating
Reheat chilled chocoflan slices gently in the microwave for about 20 seconds if you prefer a slightly warm dessert, but be careful not to overheat as it can cause the flan to separate. Serving it cold or at room temperature is ideal to savor the full magic of the melting textures.
FAQs
Why does the flan sink to the bottom during baking?
It’s all thanks to the difference in density between the cake batter and flan mixture. The denser flan naturally sinks below the lighter cake batter during baking, giving you the beautiful two-layer effect that makes this recipe so unique.
Can I use regular caramel instead of cajeta?
Absolutely, regular caramel works well and will still provide a delicious caramel layer. However, cajeta brings a distinctive rich flavor made from goat’s milk, adding a slightly different but wonderfully traditional twist to the dessert.
Is it necessary to use a water bath?
Yes, the water bath steams the flan gently and cooks it evenly without cracking or curdling. This technique is essential for the smooth custard texture that defines the flan portion of this recipe.
Can I make this dessert gluten-free?
You can experiment by swapping the all-purpose flour for a gluten-free flour blend. Just be mindful that gluten-free flours vary in texture and moisture, so the cake layer’s consistency might change slightly.
How long can I refrigerate the chocoflan after baking?
Typically, it’s best enjoyed within 4 days of refrigeration. Beyond that, the texture may start to change and the flavors won’t be as vibrant. So plan ahead for freshness!
Final Thoughts
The Magic Melt Chocoflan Recipe is one of those desserts that brings joy to the table and creates unforgettable memories. It’s simple enough for a weekend project but impressive enough for special occasions, combining luscious flavors and textures that truly melt in your mouth. Give it a try—you’ll fall in love with the magic just like I did, and your friends and family will be asking for seconds before you know it!
Print
Magic Melt Chocoflan Recipe
- Prep Time: 25 minutes
- Cook Time: 1 hour 15 minutes
- Total Time: 5 hours 40 minutes
- Yield: 12 servings
- Category: Dessert
- Method: Baking
- Cuisine: Mexican
Description
The Sweetest Twist: Magic Melt Chocoflan is a delightful Mexican dessert that combines rich chocolate cake with creamy flan in a magical layered treat. This unique dessert features a moist, cinnamon-infused chocolate cake base topped with a luscious cream cheese flan, all beautifully caramelized with cajeta. Baked in a water bath, the flan creates a smooth, custardy layer that magically appears on top when inverted, making it as stunning as it is delicious. Perfect for special occasions or a decadent treat, this recipe yields twelve generous servings.
Ingredients
Flan
- 14 ounces sweetened condensed milk
- 12 ounces evaporated milk
- 4 ounces cream cheese, softened
- 3 large eggs
- 4 teaspoons vanilla extract (Mexican if possible)
Cake
- 10 tablespoons unsalted butter, softened
- 1 cup granulated sugar
- 1 large egg
- 1¾ cups all-purpose flour
- ½ cup unsweetened cocoa powder
- 1 tablespoon ground cinnamon
- 1 teaspoon baking powder
- ¾ teaspoon baking soda
- 1¼ cups buttermilk
Additional
- 2 tablespoons softened butter (for greasing the pan)
- ¼ cup cajeta (caramel sauce)
Instructions
- Preheat and Prepare Pan: Preheat your oven to 350°F (175°C). Grease your baking pan thoroughly with the softened butter, then evenly spread the ¼ cup of cajeta caramel sauce over the bottom. This will create a sweet base layer that enhances the flan’s caramel flavor.
- Make the Flan Mixture: In a blender or large bowl, combine the sweetened condensed milk, evaporated milk, softened cream cheese, 3 large eggs, and vanilla extract. Blend or whisk until the mixture is completely smooth and set aside to use later.
- Cream Butter and Sugar: In a separate large mixing bowl, cream together the 10 tablespoons of softened unsalted butter and granulated sugar until light and fluffy. This step aerates the mixture, contributing to a tender cake texture. Then, beat in the single large egg until fully incorporated.
- Sift Dry Ingredients: In another bowl, sift together the all-purpose flour, unsweetened cocoa powder, ground cinnamon, baking powder, and baking soda. Sifting ensures an even distribution of leavening agents and prevents lumps in the batter.
- Combine Cake Batter: Alternate adding the sifted dry ingredients and the buttermilk to the creamed butter and sugar mixture, starting and ending with the dry ingredients. Mix each addition just until combined to avoid overworking the batter, which could make the cake dense.
- Assemble Cake Layer: Pour the prepared chocolate cake batter evenly over the cajeta layer in the greased pan. Smooth the top gently to create an even layer.
- Layer the Flan Mixture: Carefully pour the flan mixture over the chocolate cake batter. Don’t worry if it sinks during baking—that’s the magic of chocoflan layering.
- Prepare Water Bath: Place the filled pan into a larger baking dish. Pour hot water into the outer dish until it reaches about 1 inch up the sides of the pan. This bain-marie helps the flan cook evenly and prevents cracking.
- Bake: Bake in the preheated oven for 1 hour to 1 hour 15 minutes, or until the flan is set and the cake is fully cooked through (test with a toothpick; it should come out mostly clean with a few moist crumbs).
- Cool and Chill: Remove the chocoflan from the oven and let cool completely on a wire rack. Once room temperature is reached, refrigerate for at least 4 hours or overnight to allow the layers to set fully and flavors to meld.
- Unmold and Serve: To serve, carefully invert the chilled chocoflan onto a serving plate. The flan layer will be gloriously on top with the caramelized cajeta coating it, revealing the chocolate cake underneath. Slice and enjoy this luscious Mexican dessert!
Notes
- Using Mexican vanilla extract enhances the flavor authenticity of the flan.
- Be sure to soften the cream cheese and butter to room temperature for smooth mixing.
- The water bath is crucial to avoid curdling and cracking of the flan.
- Refrigeration overnight improves the texture and flavor development.
- Use a pan with high sides to prevent water from leaking into the chocoflan batter during baking.


