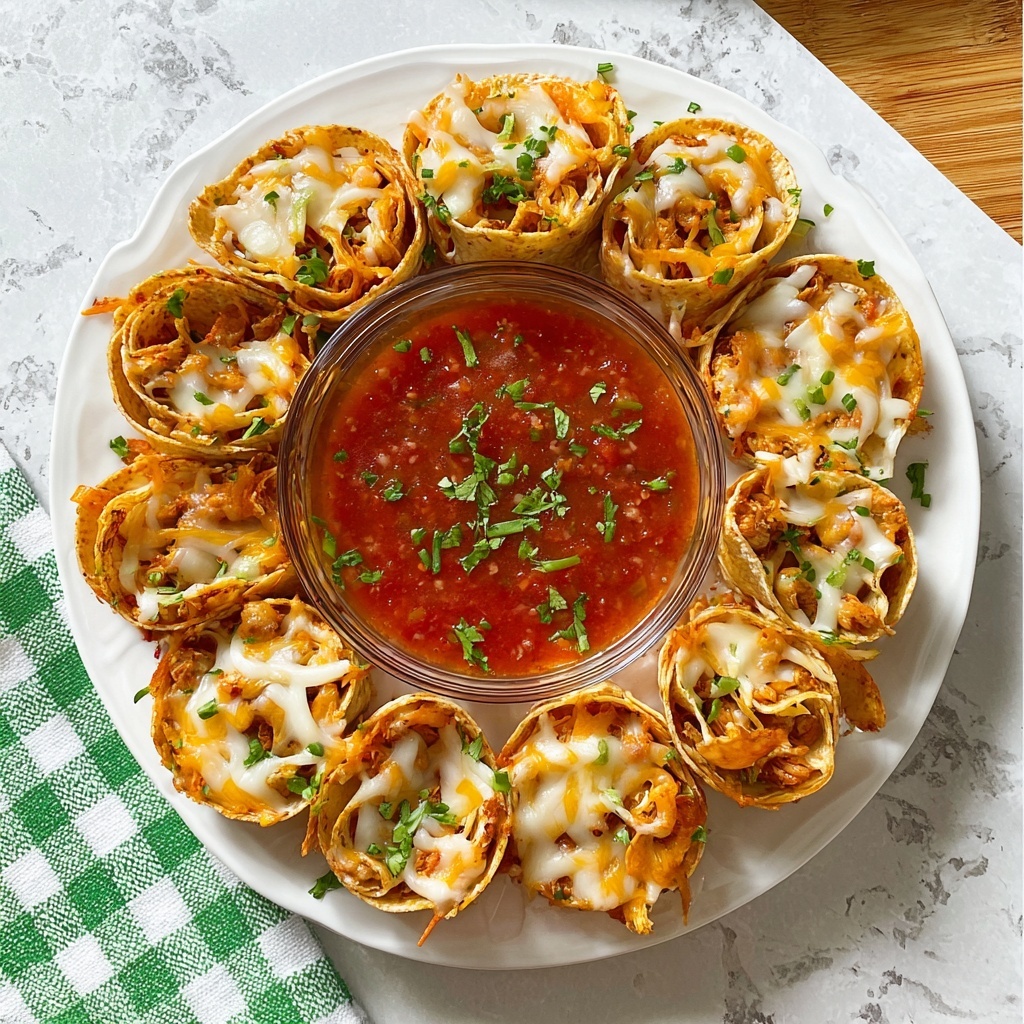
If you’re searching for a show-stopping appetizer that’s as fun to eat as it is to look at, the Blooming Chicken Quesadilla Ring Recipe is ready to become your new favorite party pleaser. This vibrant, cheesy, and hearty quesadilla ring boasts layers of tender chicken, melty cheeses, colorful peppers, and zesty spices all rolled into perfect little cones arranged in a stunning ring. Each bite combines creamy, tangy, and savory flavors with a satisfying crispness, creating a dish that’s as delightful to serve as it is to devour. Whether you’re hosting game day, family dinner, or just craving something deliciously different, this recipe truly blooms with every bite.

Ingredients You’ll Need
Nothing complicated here, just a handful of fresh and pantry staples that come together effortlessly to craft a dish bursting with flavor, texture, and color. Each ingredient plays a purposeful role, from the creamy tang of cream cheese to the fresh crunch of peppers and the vibrant zip of lime juice.
- 2 tablespoons olive oil: For perfectly sautéing the veggies to tender, caramelized goodness.
- 1 medium onion (thinly sliced): Adds natural sweetness and depth of flavor.
- 2 bell peppers (sliced, mixed colors): Provides crunch and pops of vibrant color.
- 8 ounces cream cheese (room temperature): The luscious base for a creamy chicken filling.
- ¼ cup sour cream (or plain Greek yogurt): Adds tang and smoothness to balance spices.
- 1 tbsp lime juice: Brings refreshing zest to brighten the whole dish.
- ¼ cup mozzarella cheese (shredded): Melts beautifully to give gooey goodness.
- ¼ cup cheddar cheese (shredded): Sharpness that enhances every mouthful.
- 1 ½ tbsp taco seasoning: The spice blend that gives the filling its bold personality.
- 3 cups cooked chicken (shredded): The hearty protein that makes this quesadilla ring filling and satisfying.
- 12 medium flour tortillas (10″-12″): The tortilla cones that cradle the tasty chicken mixture.
- ¼ cup cheddar cheese (shredded): For topping and creating that beautiful golden crust.
- ¼ cup mozzarella cheese (shredded): Additional melting cheese topping.
- Cooking spray: To help crisp and brown the tortilla edges perfectly.
- 3 green onions (thinly sliced): A fresh, mild oniony garnish.
- Salsa: Essential for dipping and adding a lively kick.
- Guacamole: Creamy, cool contrast to the warm filling.
- Sour cream: Classic spread to round out the flavors.
How to Make Blooming Chicken Quesadilla Ring Recipe
Step 1: Sauté the Vegetables
Start by warming 2 tablespoons of olive oil in a skillet over medium heat. Add the thinly sliced onion and colorful bell peppers, letting them cook until they soften and turn golden brown, about 5 to 6 minutes. Stir frequently so they don’t stick or burn. Once beautifully caramelized, set them aside to cool, as they’ll add a lovely sweet and smoky base to your chicken filling.
Step 2: Prepare the Chicken Filling
In a large bowl, combine the room temperature cream cheese with sour cream, lime juice, shredded mozzarella and cheddar, and taco seasoning. Stir until smooth and evenly mixed. Then fold in the shredded cooked chicken along with the cooled veggies. Gently mix until every shred of chicken is coated with the creamy, cheesy goodness and pockets of sweet peppers are evenly distributed. This filling is where all the magic begins!
Step 3: Form the Tortilla Cones
Take your 12 medium flour tortillas and slice each in half to create 24 semicircles. Spoon about 1.5 to 2 tablespoons of the chicken filling onto each half, spreading the filling but leaving a small border around the edge for easier rolling. Carefully roll each semicircle tightly into a cone shape, ensuring the filling stays tucked inside without oozing out. These little cones are the building blocks of your blooming ring.
Step 4: Assemble the Ring
Place a small round bowl in the center of a parchment-lined baking tray – this will help guide your ring shape. Arrange half of the tortilla cones around the bowl with the pointed ends touching the bowl, forming a neat circle base. Sprinkle half of the shredded cheddar and mozzarella cheese over this base. Then layer the remaining cones on top to build a second ring. Finally, top with the remaining shredded cheese and remove the bowl carefully, leaving a perfect circular cavity in the center.
Step 5: Bake to Perfection
Spray the edges of the tortilla cones with cooking spray or brush lightly with olive oil to promote golden crispiness. Place the tray in a preheated oven at 375°F (190°C) on the middle rack. Bake for 15-20 minutes until the cheese is gloriously melted and the tortilla edges are crispy and browned. This step transforms the ring into a warm, inviting centerpiece bursting with melty texture and contrasting crunch.
Step 6: Garnish and Serve
Once out of the oven, carefully transfer your Blooming Chicken Quesadilla Ring to a serving platter. Sprinkle thinly sliced green onions over the top for a fresh pop of color and mild oniony bite. Fill the center space with a bowl of vibrant salsa, and serve alongside bowls of cool guacamole and creamy sour cream for dipping. Now get ready to wow your guests with every delectable bite!
How to Serve Blooming Chicken Quesadilla Ring Recipe

Garnishes
Fresh green onions are perfect for their mild crunch and brightness. You can also add a squeeze of lime just before serving to heighten the zestiness, or sprinkle chopped fresh cilantro to add herbal freshness. A light dusting of smoked paprika or chili powder can also amp up the visual appeal and flavor without overwhelming the dish.
Side Dishes
This cheese-filled, protein-packed ring pairs wonderfully with crisp salads, like a simple arugula with lemon vinaigrette, or a refreshing corn and black bean salad for adding a fresh contrast. For something heartier, a side of Mexican rice or refried beans rounds out the meal with satisfying warmth and texture.
Creative Ways to Present
Serving the Blooming Chicken Quesadilla Ring Recipe on a large wooden board adds rustic charm perfect for casual gatherings. You could also place each tortilla cone upright individually on small plates with a dollop of sour cream or guacamole on top for a fun bite-sized starter approach. For even more color, scatter diced tomatoes, sliced jalapeños, or avocado cubes around the platter for festive flair.
Make Ahead and Storage
Storing Leftovers
Leftover quesadilla ring stores well covered in the refrigerator for 3 to 4 days. Keep it in an airtight container or tightly wrapped in plastic wrap to maintain its moisture without becoming soggy. If you separate the cones before storing, it’s easier to reheat individual portions later.
Freezing
You can freeze the assembled but unbaked quesadilla ring. Wrap it tightly in plastic wrap and foil, then freeze for up to 2 months. When ready to bake, remove from freezer and let thaw overnight in the fridge before following the baking instructions to ensure even cooking and perfect texture.
Reheating
To reheat, place leftovers on a baking sheet and warm in a preheated 350°F (175°C) oven for 10-12 minutes or until heated through and crispy again. Avoid microwaving as it can make the tortillas soggy and the cheese greasy. Reheating in the oven brings back the delightful combination of crispy edges and melty cheesy center.
FAQs
Can I use other types of cheese for the Blooming Chicken Quesadilla Ring Recipe?
Absolutely! While mozzarella and cheddar are classic for their meltability and sharpness, you can experiment with Monterey Jack, pepper jack for some heat, or even a queso fresco for a more authentic Mexican flair. Just choose cheeses that melt well and complement the spices.
Is it possible to make this recipe vegetarian?
Yes! Simply swap the cooked chicken for sautéed mushrooms, black beans, or a combination of roasted vegetables. The cream cheese and spices will still deliver that crave-worthy creamy and flavorful filling everyone loves.
Can I prepare the filling ahead of time?
Definitely! The chicken filling can be made a day ahead and refrigerated. This actually helps the flavors meld together beautifully. Just stir the mixture before assembling to redistribute any settled liquids or spices.
What’s the best way to slice and serve individual portions?
Using a sharp knife, cut the ring through the center into wedges like a pizza. Each wedge will include several cones for a perfect balance of crispy tortilla and cheesy filling in every bite. Serve with plenty of dipping sauces on the side.
Can I use corn tortillas instead of flour tortillas?
Flour tortillas are preferred here because they are more pliable and hold the shape better when rolled into cones. Corn tortillas tend to break and aren’t as flexible, which can make assembly tricky. If you want to use corn tortillas, warm them well before rolling to improve pliability.
Final Thoughts
Trust me when I say the Blooming Chicken Quesadilla Ring Recipe is pure crowd-pleaser magic. It’s visually impressive, deliciously cheesy, and bursting with delightful layers of flavor that get better with every bite. Whether you’re feeding a hungry family, hosting a lively party, or simply want to treat yourself to a fun and unforgettable meal, this recipe deserves a place in your regular rotation. Dig in, share the joy, and watch smiles bloom all around your table!
Print
Blooming Chicken Quesadilla Ring Recipe
- Prep Time: 15 minutes
- Cook Time: 15 minutes
- Total Time: 30 minutes
- Yield: 24 servings
- Category: Appetizer
- Method: Baking
- Cuisine: Mexican-American
- Diet: Halal
Description
This Blooming Chicken Quesadilla Ring is a festive and delicious appetizer perfect for gatherings. Layers of seasoned shredded chicken, sautéed peppers and onions, and a creamy cheese mixture are wrapped in flour tortillas, arranged in a flower-like ring, and baked until golden and crispy. Served with salsa, guacamole, and sour cream for dipping, this dish combines vibrant flavors and textures, impressing guests with every bite.
Ingredients
Vegetables
- 1 medium onion, thinly sliced
- 2 bell peppers (red, yellow, green, or orange), sliced
- 3 green onions, thinly sliced (for garnish)
Dairy
- 8 ounces cream cheese, at room temperature
- ¼ cup sour cream (or plain Greek yogurt)
- ¼ cup mozzarella cheese, shredded (for filling)
- ¼ cup cheddar cheese, shredded (for filling)
- ¼ cup mozzarella cheese, shredded (for topping)
- ¼ cup cheddar cheese, shredded (for topping)
Protein
- 3 cups cooked chicken, shredded (rotisserie or homemade)
Other
- 2 tablespoons olive oil
- 1 tablespoon lime juice
- 1 ½ tablespoons taco seasoning
- 12 medium flour tortillas (10″ – 12″)
- Cooking spray or additional olive oil for brushing
- Salsa (for serving)
- Guacamole (for serving)
- Sour cream (for serving)
Instructions
- Preheat and prepare baking tray. Preheat your oven to 375℉ (190℃). Line a large baking sheet or a pizza tray with parchment paper or lightly grease with foil to prevent sticking.
- Sauté vegetables. Heat 2 tablespoons of olive oil in a large frying pan or skillet over medium heat. Add the thinly sliced onion and bell peppers. Sauté for about 5-6 minutes, stirring often, until the vegetables are softened and lightly golden. Remove from heat and set aside to cool.
- Make the chicken filling. In a large bowl, combine the room temperature cream cheese, sour cream, lime juice, shredded mozzarella and cheddar cheese, and taco seasoning. Mix thoroughly until well blended.
- Combine with chicken and veggies. Add the shredded cooked chicken and the cooled sautéed onions and peppers into the cheese mixture. Gently fold until everything is evenly incorporated. Set aside.
- Prepare tortillas. Slice each of the 12 flour tortillas in half, creating 24 semicircles.
- Fill tortillas. Evenly distribute the chicken filling among the sliced tortillas, using about 1.5 to 2 tablespoons per tortilla half. Spread the filling, leaving a small border around the edges.
- Roll tortillas into cones. Carefully roll each filled tortilla half into a cone shape, shaping tightly enough to hold but not so tight as to squeeze out the filling.
- Arrange the base layer. Place a small round bowl in the center of the prepared baking tray. Arrange half of the tortilla cones around the bowl with the pointed ends touching it, forming a ring base.
- Add cheese topping to base layer. Sprinkle half of the shredded cheddar and mozzarella cheese evenly over the arranged cones.
- Arrange the second layer. Place the remaining tortilla cones on top of the base layer to create a second ring layer. Sprinkle the remaining shredded cheddar and mozzarella over the top. Remove the bowl from the center carefully.
- Prepare for baking. Lightly spray the edges of the tortillas with cooking spray or brush them with olive oil to encourage crispiness.
- Bake the quesadilla ring. Place the baking tray on the middle rack of the oven and bake for about 15 to 20 minutes, or until the cheese is fully melted and the tortilla edges turn crispy and golden.
- Garnish and serve. Carefully transfer the baked quesadilla ring to a serving platter. Garnish with the thinly sliced green onions if desired.
- Serve with dips. Fill a small bowl with salsa and place it in the center of the ring. Serve additional bowls of sour cream and guacamole on the side for dipping. Enjoy!
Notes
- Make sure the cream cheese is at room temperature to help blend smoothly.
- You can customize the heat by adding jalapeños to the sautéed veggies or increasing taco seasoning.
- If preferred, substitute tortillas with whole wheat or gluten-free options.
- Do not overfill the tortillas to prevent filling leakage when rolling.
- Use a small, oven-safe bowl or ramekin to help shape the ring and remove it carefully to preserve the form.
- Leftovers can be refrigerated and reheated in an oven or air fryer for best texture.


