Description
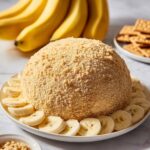
This Banana Pudding Dessert Cheese Ball is a creamy, sweet, and fun no-bake treat perfect for parties and gatherings. Combining classic banana pudding flavors with a luscious cream cheese and butter base, it’s studded with crushed vanilla wafers and optional mini white chocolate chips for extra texture and sweetness. Rolled in more crushed vanilla wafers for a delightful crunch, this dessert pairs perfectly with vanilla wafers, graham crackers, or fresh fruit for dipping.
Ingredients
Scale
Main Ingredients
- 8 oz cream cheese, softened
- ½ cup unsalted butter, softened
- 1 (3.4 oz) package instant banana cream pudding mix (dry)
- ¾ cup powdered sugar
- 1 teaspoon vanilla extract
- ⅓ cup crushed vanilla wafers (plus extra for coating)
- 2–3 tablespoons mini white chocolate chips (optional)
For Coating and Serving
- ½ cup crushed vanilla wafers (for rolling)
- Whole vanilla wafers, graham crackers, or fruit for dipping
Instructions
- Prepare the base mixture: In a medium bowl, beat the cream cheese and softened butter together until the mixture is smooth and fluffy, ensuring there are no lumps.
- Add flavorings and sugar: Incorporate the dry instant banana cream pudding mix, powdered sugar, and vanilla extract. Beat again until all ingredients are fully combined into a creamy mixture.
- Mix in crunch and optional chips: Stir in the crushed vanilla wafers along with mini white chocolate chips if you choose to use them, distributing evenly throughout the mixture.
- Chill to firm: Cover the bowl and place it in the refrigerator for about 1 hour to allow the mixture to firm up enough to handle shaping.
- Shape the cheese ball: Using a sheet of plastic wrap, scoop the chilled mixture onto it and shape into a ball, utilizing the wrap to help mold it smoothly.
- Firm up the shaped ball: Return the cheese ball wrapped in plastic wrap to the refrigerator for another 30 minutes to become firm and hold its shape well.
- Coat the exterior: Roll the chilled cheese ball in the crushed vanilla wafers until fully coated, creating a textured and tasty outer layer.
- Serve and enjoy: Place the coated cheese ball on a serving plate and keep refrigerated until ready to serve. Provide whole vanilla wafers, graham crackers, or fresh fruit alongside for dipping.
Notes
- For a fun variation in texture, roll the cheese ball in crushed freeze-dried bananas instead of vanilla wafers.
- Drizzle caramel sauce over the top before serving to enhance the sweetness and add a rich flavor.
- This cheese ball can be made up to one day in advance and stored covered in the refrigerator to save time on serving day.