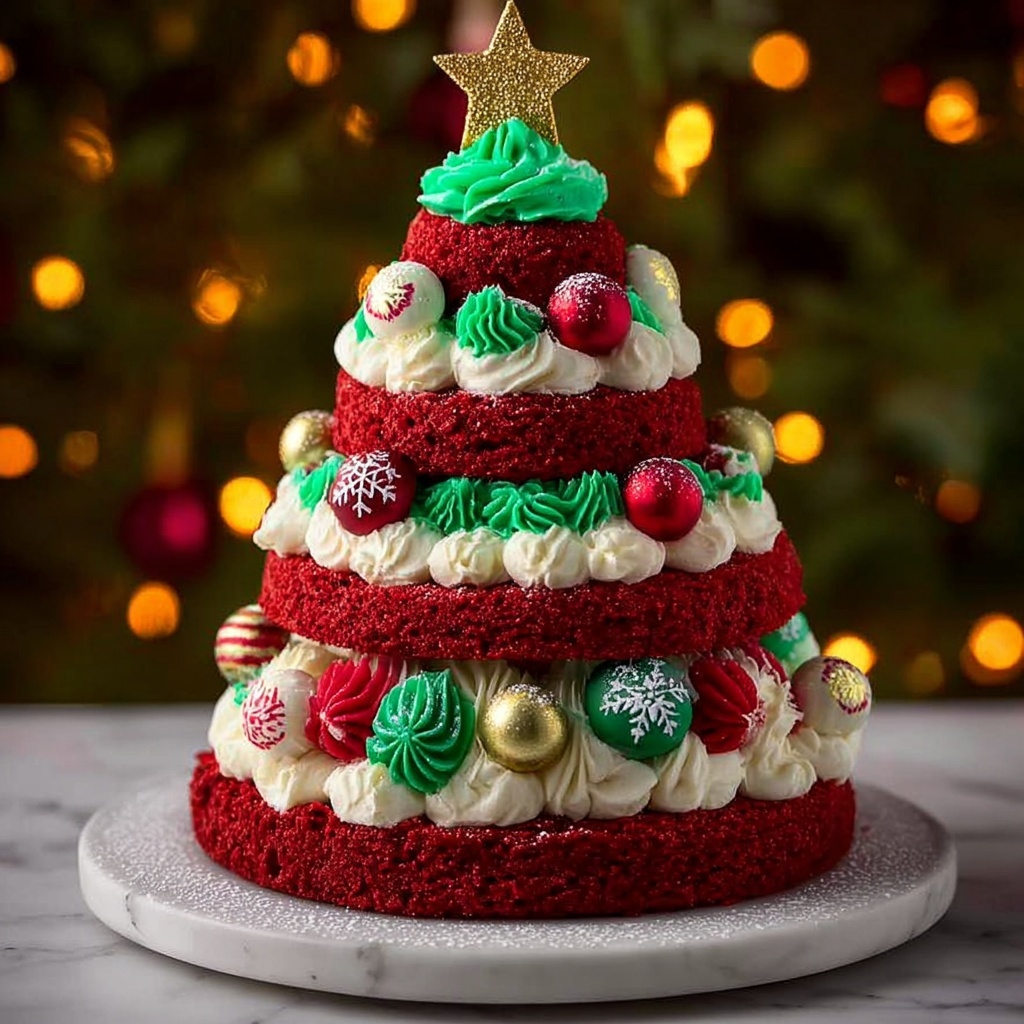
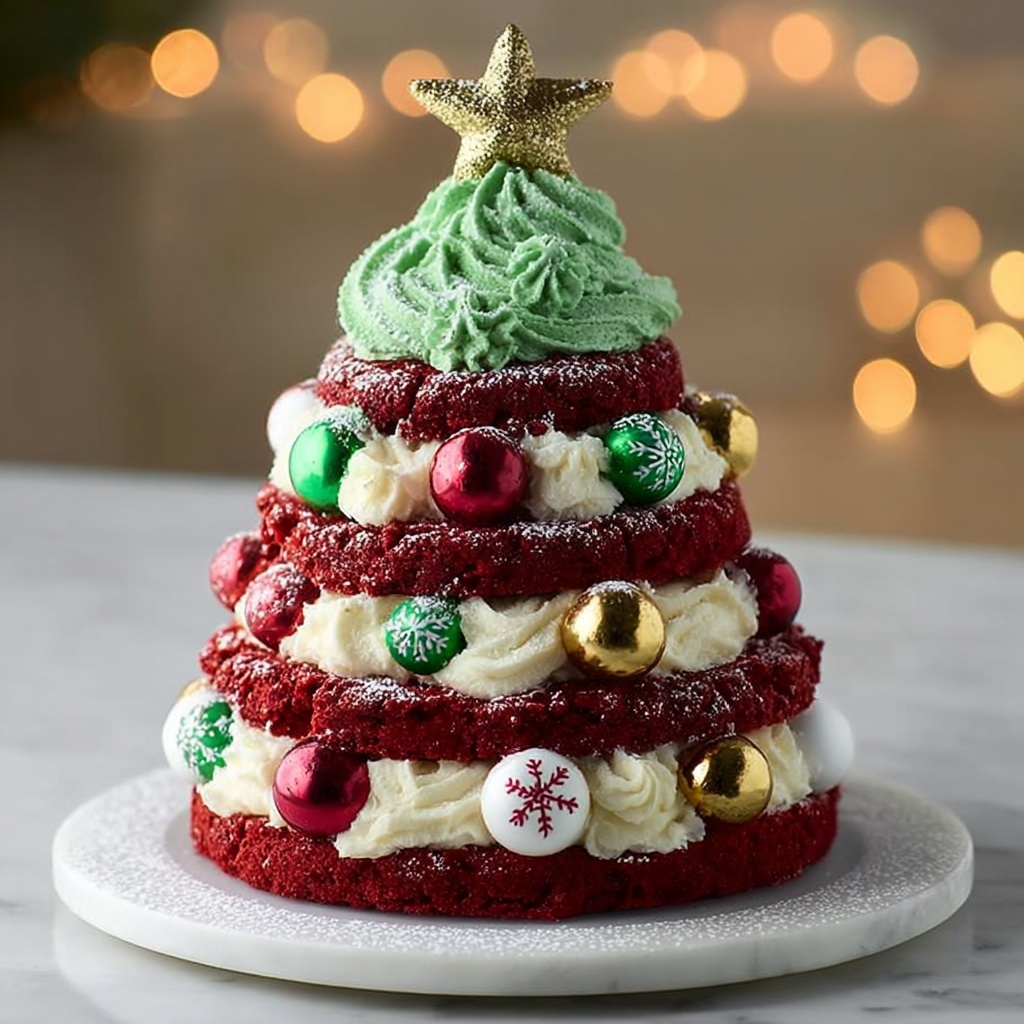
If you’re searching for a festive and delightful centerpiece for your holiday table, the Red Velvet Tree Cake Recipe is your new best friend. This charmingly shaped cake combines the tender, velvety crumb of classic red velvet with a luscious cream cheese frosting that’s smooth and tangy. Whether baked in a special tree pan or cut out by hand, it’s a fun, show-stopping dessert that comes together with simple ingredients but delivers rich flavor and holiday cheer in every bite.
Ingredients You’ll Need
Every ingredient in this Red Velvet Tree Cake Recipe plays a crucial role, from the cocoa powder adding depth to the red food coloring bringing that iconic hue. These accessible components come together to create a cake that’s moist, tender, and irresistibly festive.
- 2 1/2 cups all-purpose flour: Forms the sturdy yet tender base of the cake’s crumb.
- 2 tablespoons unsweetened cocoa powder: Adds subtle chocolate flavor that enhances the red velvet profile.
- 1 teaspoon baking soda: Helps the cake rise lightly for a soft texture.
- 1/2 teaspoon salt: Balances sweetness and enriches flavor depth.
- 1 cup unsalted butter (softened): Provides moisture and richness that melt in your mouth.
- 1 3/4 cups granulated sugar: Sweetens and helps create a light, fluffy batter.
- 2 large eggs: Bind ingredients while contributing to the cake’s structure and tenderness.
- 1 cup buttermilk: Adds acidity for tenderness and activates the baking soda for rise.
- 1 tablespoon red food coloring: Gives the cake its signature vibrant, festive color.
- 2 teaspoons vanilla extract: Enhances overall flavor with sweet warmth.
- 1 teaspoon white vinegar: Reacts with baking soda to boost rise and brightens the red tone properly.
- 8 oz cream cheese (softened): For frosting, delivers tangy smoothness.
- 1/2 cup unsalted butter (softened): Adds richness and silky texture to the frosting.
- 3 1/2 cups powdered sugar: Sweetens the frosting without graininess.
- 1 teaspoon vanilla extract: Brings aroma and flavor to the frosting.
- Optional decorations: Green food coloring, festive sprinkles, mini chocolate chips, star-shaped candy toppers—all fun touches to create a true Christmas tree look.
How to Make Red Velvet Tree Cake Recipe
Step 1: Prepare Your Oven and Pan
Begin by preheating your oven to 350°F (175°C). Grease and flour your tree-shaped cake pan if you have one, or prepare a standard sheet pan for cutting tree shapes later. Setting up your baking equipment properly is a simple step that ensures your cake will release easily and bake evenly.
Step 2: Mix Dry Ingredients
In a medium bowl, whisk together the flour, cocoa powder, baking soda, and salt. This ensures the leavening agents and cocoa are evenly distributed, which leads to a consistent crumb and the perfect subtle chocolate undertone in your red velvet cake.
Step 3: Cream Butter and Sugar
In a large bowl, beat the softened butter and granulated sugar until light and fluffy, usually about 3 to 5 minutes. This step incorporates air necessary for a soft cake and helps the sugar dissolve for a smooth batter.
Step 4: Add Eggs
Beat in the eggs, one at a time, making sure each is fully incorporated before adding the next. This careful mixing helps maintain the batter’s light texture and structure.
Step 5: Combine Wet Ingredients
In a small bowl, whisk together buttermilk, red food coloring, vanilla extract, and white vinegar. These wet ingredients add moistness, flavor, and that signature bold red hue critical for this holiday cake.
Step 6: Alternate Adding Dry and Wet Ingredients
Add the flour mixture and the wet mixture alternately to the butter and sugar batter, beginning and ending with the dry ingredients. Mix gently until just combined—overmixing can make the cake dense, so be gentle to keep it tender.
Step 7: Bake and Cool
Pour the batter into your prepared pan and smooth the surface with a spatula. Bake for 25 to 30 minutes, testing doneness by inserting a toothpick which should come out clean or with just a few crumbs. Allow the cake to cool completely before frosting to prevent melting or sliding.
Step 8: Make the Cream Cheese Frosting
Beat together the cream cheese and softened butter until completely smooth, then gradually add powdered sugar and vanilla extract. Continue beating until the frosting is fluffy and luscious. If you want to add green for a festive touch, tint a portion of the frosting with green food coloring.
Step 9: Frost and Decorate the Cake
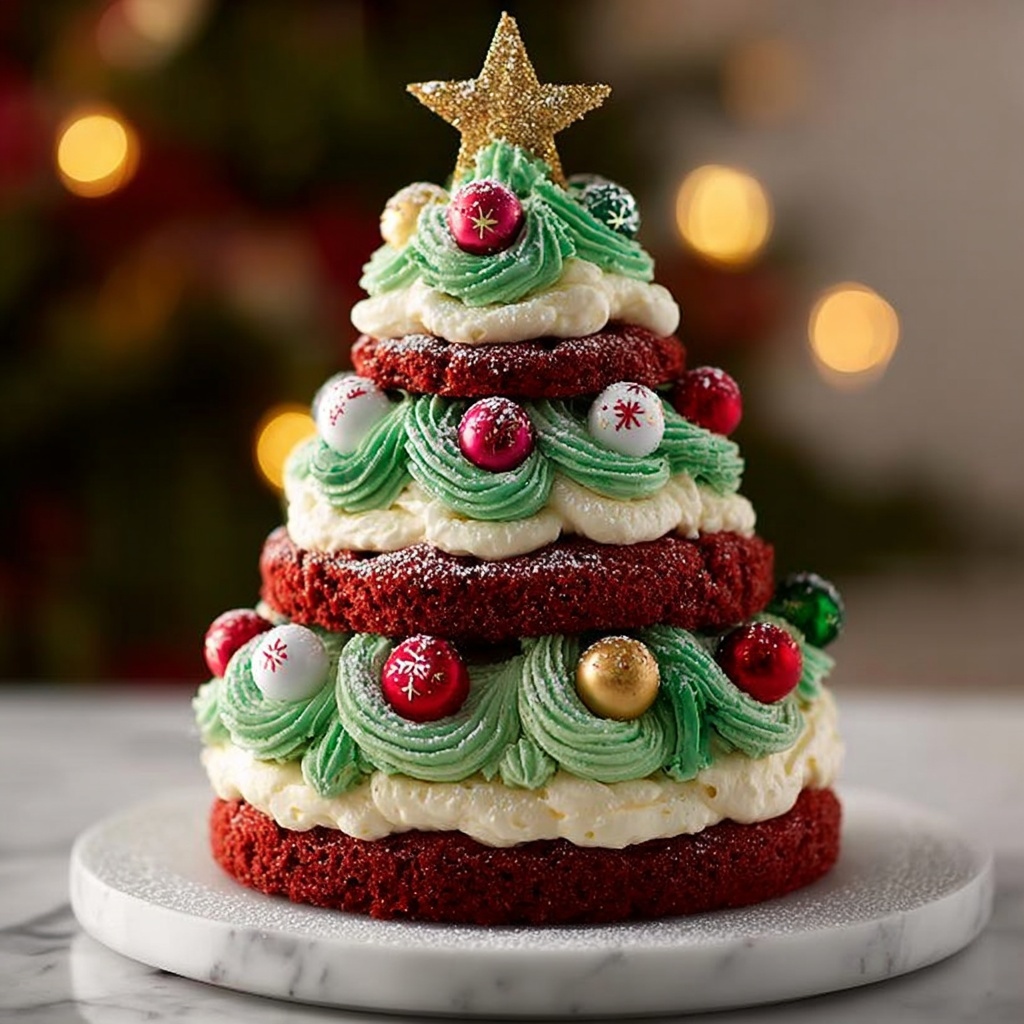
Spread or pipe the frosting over the cooled cake. Use your green frosting as playful “branches” and adorn with sprinkles, mini chocolate chips, and star toppers to bring the Red Velvet Tree Cake Recipe to festive life.
How to Serve Red Velvet Tree Cake Recipe
Garnishes
Adding garnishes enhances the festive vibe and texture of your Red Velvet Tree Cake Recipe. Play with colorful sprinkles to mimic ornaments, or star-shaped candies as shining treetops. Mini chocolate chips add delightful contrast both visually and in flavor.
Side Dishes
This rich and moist cake pairs beautifully with simple sides like lightly whipped cream or a scoop of vanilla bean ice cream. Fresh berries or a warm cup of spiced tea also complement the cake’s sweetness perfectly, elevating the entire dessert experience.
Creative Ways to Present
If you don’t have a tree-shaped pan, bake the cake in a sheet pan and cut out tree shapes with a cookie cutter. Stack multiple layers with frosting between for a stunning 3D effect, then decorate as desired. For a party, individual mini Red Velvet Tree Cakes on sticks make fabulous handheld treats that guests will adore.
Make Ahead and Storage
Storing Leftovers
The Red Velvet Tree Cake Recipe keeps well in an airtight container in the refrigerator for up to 5 days. This prevents the cream cheese frosting from spoiling and retains the cake’s moist texture, perfect for enjoying leftovers without drying out.
Freezing
You can freeze this cake either frosted or unfrosted. Wrap tightly with plastic wrap and aluminum foil to protect from freezer burn and preserve flavor. Frozen cake can last up to 2 months, making it a great option to prepare ahead for holiday festivities.
Reheating
For the best texture, let frozen cake thaw in the refrigerator overnight before serving. Avoid microwaving the frosted cake as this can melt the frosting. If reheating unfrosted slices, a brief warm-up in the oven retains moisture and fresh-baked warmth.
FAQs
Can I make this cake without a tree-shaped pan?
Absolutely! If you don’t have a tree-shaped pan, bake the cake in a regular sheet pan and cut out tree shapes with a cookie cutter or stencil. This flexibility lets you enjoy the festive theme without special equipment.
Why is vinegar included in the recipe?
White vinegar reacts with baking soda to help the cake rise and also brightens the red color, enhancing that iconic red velvet appearance and providing a tender crumb.
Can I use regular milk instead of buttermilk?
Buttermilk is preferred because its acidity activates the baking soda and tenderizes the cake. If you don’t have buttermilk, you can make a substitute by adding a tablespoon of vinegar or lemon juice to a cup of milk and letting it sit for 5 minutes.
How do I get the frosting perfectly smooth and fluffy?
Make sure your cream cheese and butter are softened before beating them together. Beat on medium speed until smooth before gradually adding powdered sugar. Finish with vanilla extract and continue beating until light and fluffy for the best texture.
Can I add other flavors or colors to the frosting?
Yes, you can tint part of your frosting with green food coloring for a festive tree look, or even add peppermint extract for a holiday twist. Just be sure to balance added flavors so the cream cheese’s tang remains the star.
Final Thoughts
This Red Velvet Tree Cake Recipe has quickly become one of my favorite holiday desserts to share with friends and family. Its gorgeous color, tender crumb, and luscious frosting never fail to impress, and the festive tree shape sparks joy and holiday spirit. Give this recipe a try and bring a slice of cheer to your celebrations—you’ll be delighted by the smiles it creates!
Print
Red Velvet Tree Cake Recipe
- Prep Time: 25 minutes
- Cook Time: 30 minutes
- Total Time: 55 minutes
- Yield: 12 servings
- Category: Dessert
- Method: Baking
- Cuisine: American
- Diet: Vegetarian
Description
This Red Velvet Tree Cake is a festive and visually stunning dessert perfect for holiday celebrations. Featuring a moist and tender red velvet cake layered with rich and tangy cream cheese frosting, this cake is shaped like a Christmas tree to bring a joyful spirit to your dessert table. Easy to make and delicious, it combines classic flavors with a fun seasonal twist.
Ingredients
Cake Ingredients
- 2 1/2 cups all-purpose flour
- 2 tablespoons unsweetened cocoa powder
- 1 teaspoon baking soda
- 1/2 teaspoon salt
- 1 cup unsalted butter, softened
- 1 3/4 cups granulated sugar
- 2 large eggs
- 1 cup buttermilk
- 1 tablespoon red food coloring
- 2 teaspoons vanilla extract
- 1 teaspoon white vinegar
Frosting Ingredients
- 8 oz cream cheese, softened
- 1/2 cup unsalted butter, softened
- 3 1/2 cups powdered sugar
- 1 teaspoon vanilla extract
Optional Decorations
- green food coloring
- festive sprinkles
- mini chocolate chips
- star-shaped candy toppers
Instructions
- Preheat and Prepare Pan: Preheat your oven to 350°F (175°C). Grease and flour a tree-shaped cake pan or a standard 9×13-inch sheet pan if you plan to cut out tree shapes later.
- Mix Dry Ingredients: In a medium bowl, whisk together the all-purpose flour, unsweetened cocoa powder, baking soda, and salt to combine evenly.
- Cream Butter and Sugar: In a large bowl, beat the softened butter and granulated sugar together until the mixture is light and fluffy, which gives the cake a soft texture.
- Add Eggs: Beat in the eggs one at a time until fully incorporated to ensure even distribution in the batter.
- Combine Wet Ingredients: In a small bowl, stir together the buttermilk, red food coloring, vanilla extract, and white vinegar to mix the wet flavor components.
- Mix Batter: Alternately add the dry ingredients and the wet ingredients to the butter mixture in batches, starting and ending with the dry ingredients. Mix everything just until combined to prevent overmixing and keep the cake tender.
- Bake the Cake: Pour the batter into the prepared pan and smooth the surface with a spatula. Bake in the preheated oven for 25 to 30 minutes, or until a toothpick inserted into the center comes out clean.
- Cool the Cake: Remove the cake from the oven and let it cool completely before applying frosting to prevent melting.
- Prepare Frosting: Beat the softened cream cheese and butter together until smooth and creamy. Gradually add the powdered sugar and vanilla extract, beating until the frosting is fluffy.
- Decorate: If desired, tint a portion of the frosting green using green food coloring. Spread or pipe the frosting onto the cooled cake to create the festive tree shape. Add sprinkles, mini chocolate chips, or star-shaped candy toppers for extra holiday charm.
Notes
- If you don’t have a tree-shaped pan, bake the cake in a 9×13-inch pan and use a cookie cutter or stencil to cut out tree shapes before decorating.
- For a 3D effect, bake multiple layers and stack them with frosting in between.
- Ensure the cake is completely cool before frosting to avoid the frosting melting or sliding off.
- The red food coloring provides the characteristic red velvet color; adjust the amount to achieve your preferred shade.


