
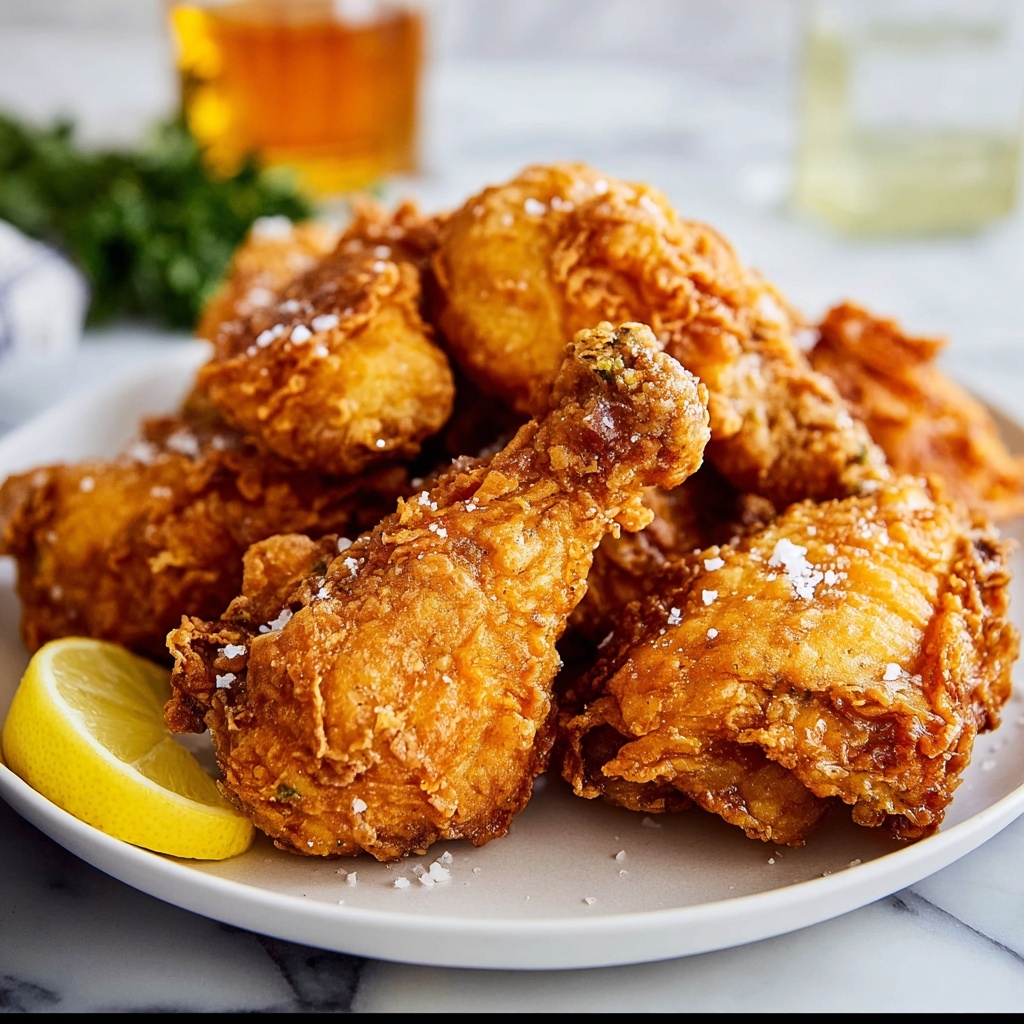
If you have ever dreamed of sinking your teeth into irresistibly crispy, juicy chicken that tastes like it was lovingly prepared in a cozy kitchen, then you’re in for a real treat with Grandma’s Fried Chicken Recipe. This classic southern comfort food has all the magic — a perfect balance of bold seasoning, tender buttermilk-soaked meat, and a golden, crunchy crust that’s nothing short of pure happiness on a plate. Trust me, once you try making this recipe, it will become one of your most cherished go-to meals that brings everyone to the table with smiles.

Ingredients You’ll Need
The beauty of Grandma’s Fried Chicken Recipe lies in its straightforward, wholesome ingredients. Each component plays a crucial role: the buttermilk adds moisture and tang, the spices build flavor depth, and the flour coating crisps up to golden perfection. Here’s what you’ll gather to create this classic masterpiece:
- 1 whole chicken (cut into 8–10 pieces): Using bone-in pieces ensures juicy meat that cooks evenly and maintains flavor.
- 2 cups buttermilk: This tenderizes the chicken while infusing it with a subtle tangy richness.
- 2 teaspoons salt (divided): Essential for seasoning the chicken inside and out to enhance all flavors.
- 1 teaspoon black pepper: Adds just the right amount of warmth and spice without overpowering.
- 1 teaspoon paprika: Contributes a smoky sweetness and helps give that beautiful golden color.
- ½ teaspoon garlic powder: For aromatic depth and a gentle savory boost.
- ½ teaspoon onion powder: Balances flavors with a subtle, sweet onion note.
- 2 cups all-purpose flour: The crispy crust base and perfect crunch carrier.
- 1 teaspoon baking powder: Adds lightness to the coating, making it incredibly crisp.
- Vegetable oil (for frying): Needed in abundance to achieve that mouthwatering crisp crust without greasiness.
How to Make Grandma’s Fried Chicken Recipe
Step 1: Soak the Chicken in Buttermilk
Start by placing your chicken pieces in a large bowl and pouring the buttermilk over them. Sprinkle in 1 teaspoon of salt to season the meat as it tenderizes. Cover this and refrigerate for at least 4 hours, or better yet, overnight. This soaking process works wonders, making the chicken delectably tender and perfectly juicy after frying. It’s the secret step that transforms simple chicken into a deeply flavorful dish.
Step 2: Prepare the Flour Coating
While the chicken marinates, mix together the all-purpose flour with the remaining teaspoon of salt, black pepper, paprika, garlic powder, onion powder, and baking powder. These spices and the baking powder combine to give the coating its signature crispness and packed flavor. This blend is what surrounds each piece in a deliciously crunchy shell that locks in the juiciness.
Step 3: Dredge and Rest the Chicken
Remove each piece from the buttermilk marinade, letting any excess drip back into the bowl. Dredge thoroughly in the seasoned flour mixture, pressing gently yet firmly to make sure every bit of chicken is well-coated. Then, allow the breaded pieces to rest on a rack or plate for about 10 to 15 minutes. This resting time is crucial as it helps the coating set, preventing it from falling off during frying.
Step 4: Fry the Chicken to Golden Perfection
Heat about 2 inches of vegetable oil in a deep skillet or Dutch oven to 325°F (165°C). Carefully place the chicken pieces in batches to avoid overcrowding, turning them occasionally as they fry. Each batch will take roughly 12 to 15 minutes, though thicker pieces might need a few extra minutes. The goal is a gorgeous golden crust with an internal temperature of 165°F to ensure the chicken is safely cooked but still juicy inside. Drain the fried chicken on a wire rack or paper towels to keep it crisp.
How to Serve Grandma’s Fried Chicken Recipe
Garnishes
Nothing beats a simple garnish that complements but doesn’t overshadow your star dish. Sprinkle some freshly chopped parsley or a few sprigs of thyme across the fried chicken for vibrant color and a hint of fresh fragrance. A wedge of lemon on the side adds a zesty brightness that some diners love to squeeze on just before eating.
Side Dishes
Grandma’s Fried Chicken Recipe shines even more when paired with classic southern sides. Creamy mashed potatoes, a tangy coleslaw, and sweet cornbread are traditional choices that bring out the best in this meal. These sides provide balance with their textures and flavors — creamy, crisp, and sweet — creating the perfect harmony on your plate.
Creative Ways to Present
For a fun twist, serve your fried chicken stacked high on a rustic wooden board with bowls of honey, hot sauce, or spicy ranch dressing for dipping. Or, layer the chicken atop a bed of fresh greens and pickled vegetables for a modern Southern-inspired salad. Presentation can elevate this heartwarming dish into an unforgettable meal experience.
Make Ahead and Storage
Storing Leftovers
Once cooled, wrap leftover fried chicken tightly in foil or place it in an airtight container and refrigerate. It will stay delicious and safe to eat for up to 3 to 4 days. Storing properly keeps the chicken moist without sacrificing too much of the crispy texture.
Freezing
If you want to make a big batch for future meals, freeze your fried chicken in single layers separated by parchment paper inside a freezer-safe container or bag. It freezes well for up to 2 months. Just be sure to thaw it in the fridge overnight before reheating to maintain taste and texture.
Reheating
To revive that beloved crunch, reheat your leftovers in a preheated oven at 375°F (190°C) for about 10 to 15 minutes, flipping halfway through. Avoid microwaving if you want to keep the crust crispy. This method also ensures the chicken warms evenly without drying out.
FAQs
Can I use chicken thighs or breasts instead of a whole chicken?
Absolutely! While using a whole chicken gives a mix of dark and white meat, you can adapt Grandma’s Fried Chicken Recipe with just thighs or breasts. Keep in mind thighs remain juicier, while breasts may need careful frying time to prevent drying out.
Is it necessary to soak the chicken in buttermilk?
While you could skip it, soaking chicken in buttermilk is a game changer. It breaks down proteins, making the meat tender and juicy, and the slight acidity adds flavor depth. It’s a step you won’t want to miss for authentic results.
What oil is best for frying chicken?
Vegetable oil is great because of its neutral flavor and high smoke point, which prevents burning. Peanut or canola oil also work well if preferred. Avoid olive oil, as its lower smoke point may cause the coating to burn before the chicken is cooked.
How can I tell when the chicken is fully cooked?
The most reliable way is to use a meat thermometer inserted into the thickest part of the chicken, avoiding bone. Once it reaches 165°F, the chicken is safe and perfectly cooked. Visual cues like golden crust and clear juices flowing out can help but are less precise.
Can I make the coating spicier?
Yes! You can easily adjust the seasoning mixture by adding cayenne pepper or chili powder to give the crust a spicy kick. It’s a fun way to customize Grandma’s Fried Chicken Recipe to your heat preference without changing the core technique.
Final Thoughts
There’s something truly special about Grandma’s Fried Chicken Recipe that connects us to comforting meals gathered around the table, laughter echoing, and memories made. This recipe is a perfect blend of tradition and simple, honest ingredients that anyone can master. So roll up your sleeves and give it a try — I promise this crispy, juicy fried chicken will become a beloved staple in your home.
Print
Grandma’s Fried Chicken Recipe
- Prep Time: 15 minutes (plus 4+ hours marinating)
- Cook Time: 30–40 minutes
- Total Time: 45–55 minutes (active cooking plus marinating time excluded)
- Yield: 4–6 servings
- Category: Main Course
- Method: Frying
- Cuisine: Southern American
Description
Grandma’s Fried Chicken is a classic Southern American dish featuring tender chicken pieces soaked in buttermilk, seasoned, and fried to golden perfection. This recipe ensures a crispy crust with a juicy, flavorful interior, perfect for a comforting family meal.
Ingredients
Chicken and Marinade
- 1 whole chicken (cut into 8–10 pieces)
- 2 cups buttermilk
- 2 teaspoons salt, divided
Seasoned Flour Coating
- 2 cups all-purpose flour
- 1 teaspoon black pepper
- 1 teaspoon paprika
- ½ teaspoon garlic powder
- ½ teaspoon onion powder
- 1 teaspoon baking powder
For Frying
- Vegetable oil (for frying, about 2 inches deep)
Instructions
- Marinate the Chicken: Place the chicken pieces in a large bowl and pour the buttermilk over them. Add 1 teaspoon of salt, cover the bowl, and refrigerate for at least 4 hours or overnight to tenderize the chicken and infuse flavor.
- Prepare the Coating: In a separate bowl, combine the flour, remaining 1 teaspoon salt, black pepper, paprika, garlic powder, onion powder, and baking powder. Mix well to evenly distribute the seasonings.
- Coat the Chicken: Remove the chicken pieces from the buttermilk, allowing excess to drip off. Dredge each piece in the seasoned flour mixture, pressing firmly to ensure a good coating. Let the coated chicken rest for 10–15 minutes to help the crust adhere better during frying.
- Heat the Oil: Pour vegetable oil into a deep skillet or Dutch oven to a depth of about 2 inches. Heat the oil to 325°F (165°C) using a thermometer to monitor the temperature.
- Fry the Chicken: Fry the chicken in batches to avoid overcrowding, turning occasionally. Cook for 12–15 minutes per batch, or longer for thicker pieces, until the crust is golden brown and the internal temperature reaches 165°F (74°C).
- Drain and Serve: Remove the fried chicken and place it on a wire rack or paper towel-lined plate to drain excess oil. Serve warm with classic sides like mashed potatoes, coleslaw, or cornbread for a traditional Southern meal.
Notes
- Soaking the chicken in buttermilk tenderizes the meat and adds a rich tangy flavor.
- Allowing the breaded chicken to rest before frying helps to create a crispier crust.
- Do not overcrowd the pan when frying to maintain the oil temperature and ensure even cooking.
- Use a thermometer to monitor oil temperature for best frying results.

