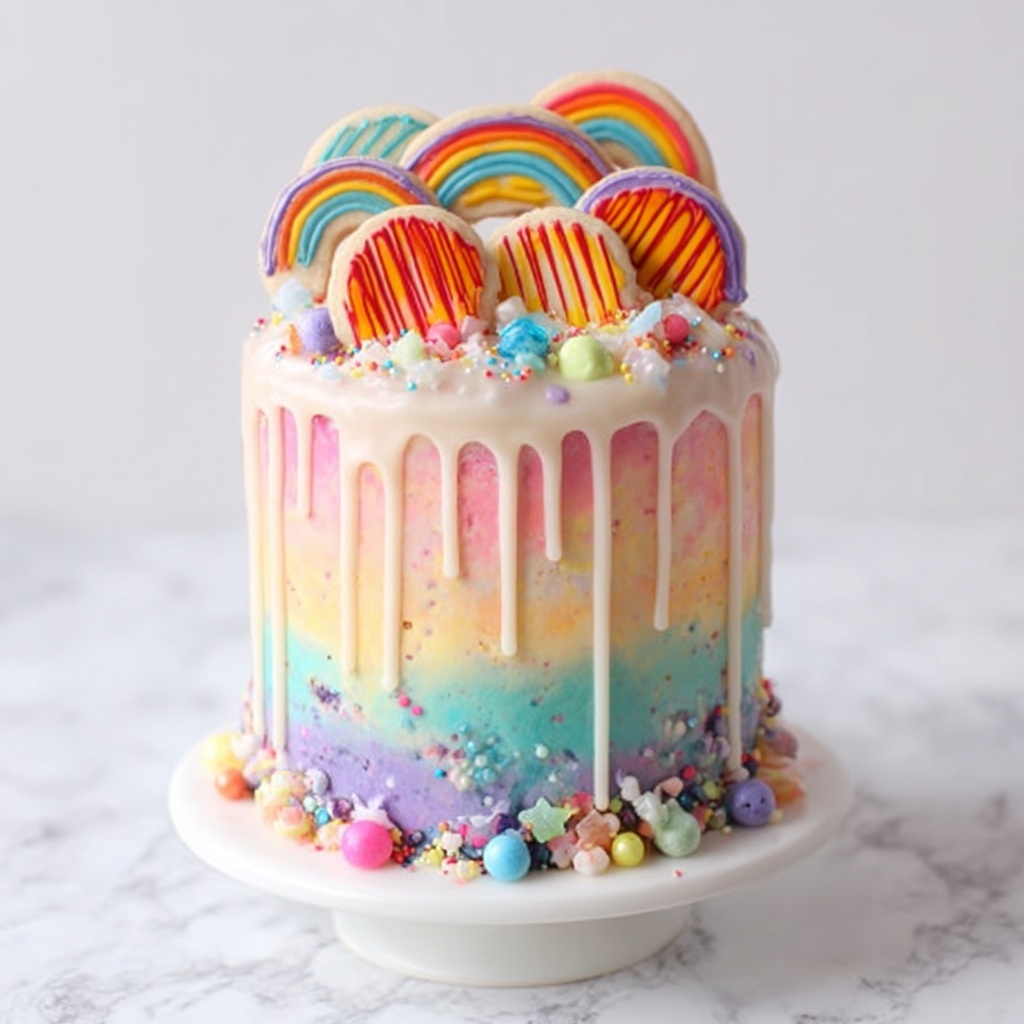
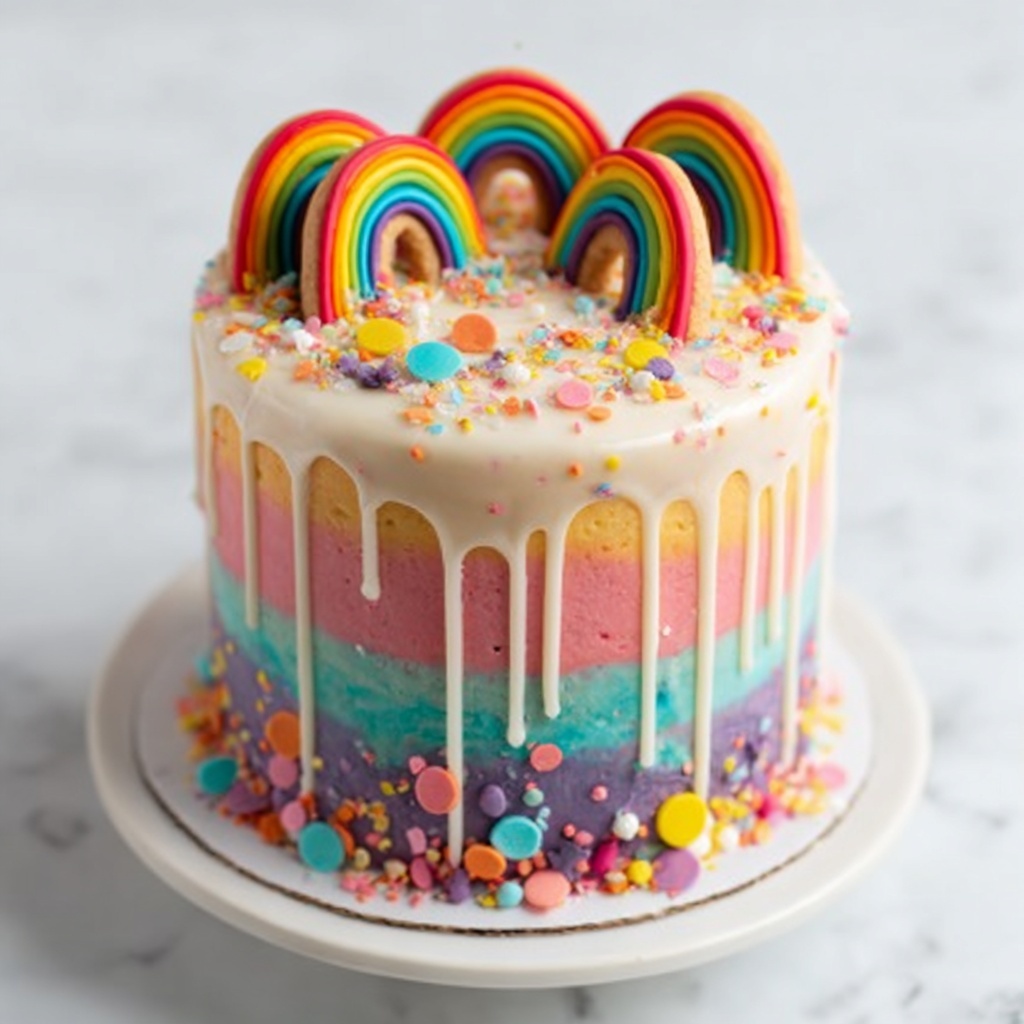
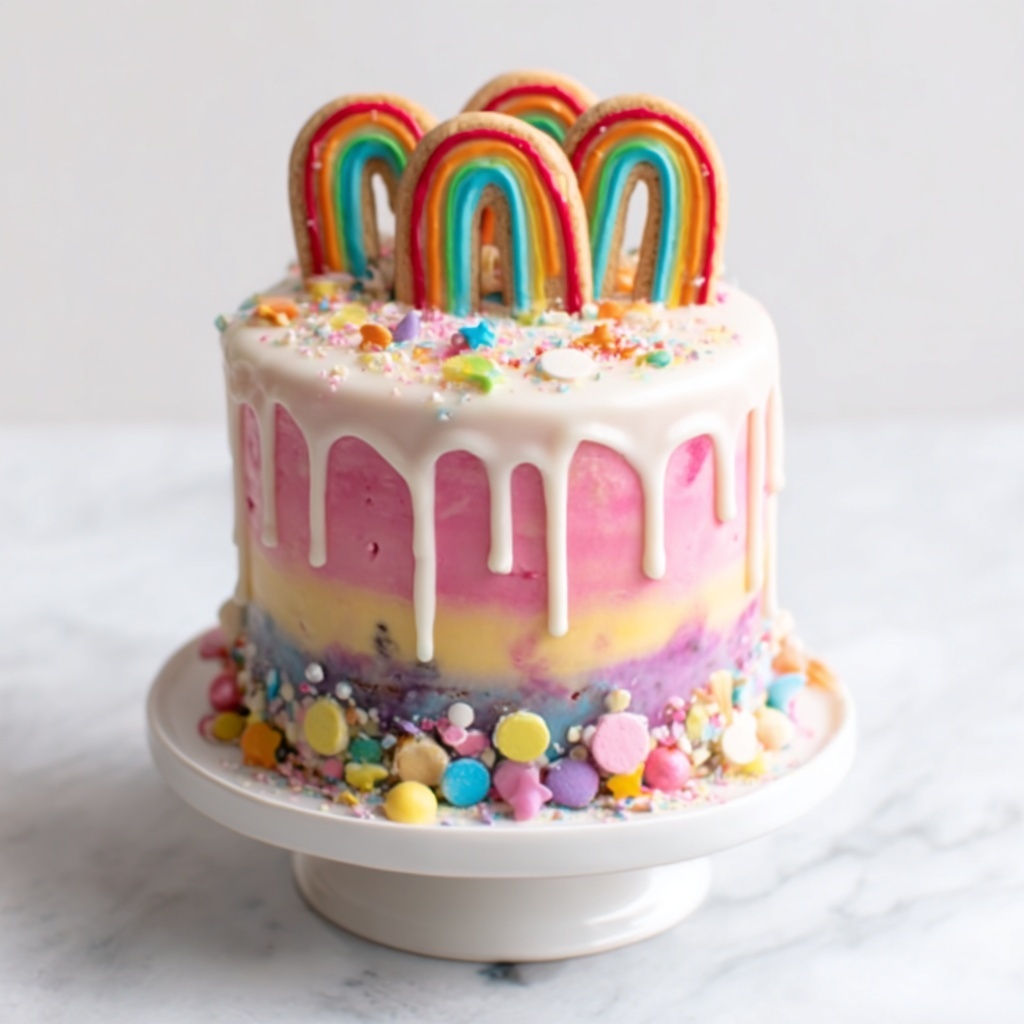
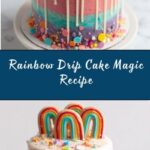
If you have ever wanted to create a show-stopping cake that bursts with vibrant colors and luscious flavors, then the Rainbow Drip Cake Magic Recipe is exactly what you need. This delightful dessert combines perfectly moist rainbow layers with silky vanilla buttercream and a stunning drip glaze that will elevate any celebration to new heights. Whether you’re baking for a birthday, a special occasion, or just because, this recipe ensures a joyful experience from start to finish. Get ready to sprinkle some magic into your kitchen with a dessert that tastes as amazing as it looks!
Ingredients You’ll Need
These ingredients are wonderfully simple yet totally essential to creating the perfect Rainbow Drip Cake Magic Recipe. Each one plays a role in building the cake’s airy texture, rich flavor, and dazzling colors you’ll love admiring and tasting.
- All-purpose flour: The sturdy base for your cake layers, giving just the right crumb and structure.
- Baking powder: Helps the cake rise beautifully for tall, fluffy layers.
- Salt: Enhances all the other flavors without overpowering the sweetness.
- Unsalted butter: Adds rich moisture and a creamy texture to both cake and frosting.
- Granulated sugar: For that irresistible sweetness and fine crumb in the cake.
- Large egg whites: Create lightness without adding extra richness, keeping layers tender.
- Vanilla extract: Infuses the cake and buttercream with warm, aromatic sweetness.
- Whole milk: Adds moisture and helps bind the ingredients together smoothly.
- Gel food coloring (red, orange, yellow, green, blue, purple): These vibrant colors bring your cake layers to life without thinning the batter.
- Powdered sugar: For silky smooth buttercream that whips up light and fluffy.
- Heavy cream or milk: Adjusts frosting consistency and enriches the drip glaze.
- White chocolate chips: Essential for creating that glossy, decadent drip glaze.
- Pinch of salt: Balances the sweetness in the frosting perfectly.
How to Make Rainbow Drip Cake Magic Recipe
Step 1: Prepare the Rainbow Cake Layers
Start by preheating your oven to 350°F (175°C) and greasing plus lining six 6-inch round cake pans. In a medium bowl, whisk together the flour, baking powder, and salt to ensure even distribution of leavening. Next, cream the softened butter and granulated sugar in a large bowl until light and fluffy. Adding egg whites and vanilla comes next, beating until the mixture is nice and smooth. Alternate adding your dry ingredients with whole milk, starting and ending with the flour, mixing gently to keep the batter light. Split the batter evenly into six bowls and color each with bright gel food coloring for a rainbow effect. Pour each colored batter into the prepared pans, then bake for about 15–18 minutes or until a toothpick comes out clean. Let them cool completely before moving on.
Step 2: Whip Up the Vanilla Buttercream
While your cakes are cooling, it’s time to prepare the luscious buttercream. Beat the softened butter until creamy, then gradually beat in powdered sugar until smooth. Next, mix in vanilla extract and a pinch of salt, then add milk or heavy cream a tablespoon at a time until the fluffy texture you desire is achieved. This buttercream not only tastes divine but also makes stacking and frosting your layers a joyous task.
Step 3: Assemble and Frost Your Cake
Once layers are cooled, level them if they’ve domed on top for neat stacking. Layer the cakes in rainbow order, evenly spreading buttercream between each colorful layer for that classic rainbow effect inside. Cover the stacked cake with a thin crumb coat of buttercream to lock in crumbs, then chill the cake for 20 minutes so everything sets perfectly. Finally, apply a smooth, final coat of buttercream for a flawless finish that you’ll be proud to drip and decorate.
Step 4: Create the Stunning Drip Glaze
For the magical finishing touch, gently heat the heavy cream until it’s just steaming and pour it over white chocolate chips. Let the mixture rest for 1-2 minutes before stirring until smooth. Add your favorite gel food coloring to tint the glaze. When it’s slightly cooled but still pourable, use a spoon or squeeze bottle to drip it elegantly over the chilled cake edges. This glazing technique adds the signature magic that makes the Rainbow Drip Cake Magic Recipe so special. Decorate the top with buttercream swirls, sprinkles, or edible glitter for an extra pop of fun.
How to Serve Rainbow Drip Cake Magic Recipe
Garnishes
Adding the right garnishes can transform your Rainbow Drip Cake Magic Recipe from lovely to extraordinary. Think brightly colored sprinkles, edible glitter, or small fondant stars to amplify the playful vibe. Fresh berries can add a little tangy contrast and freshness while elegant piped buttercream rosettes provide texture and flair. The goal is to complement the joyful colors with matching charm and whimsy.
Side Dishes
When serving this vibrant cake, consider pairing it with light and simple sides so the cake remains the star. Vanilla bean ice cream or a scoop of fresh whipped cream work beautifully without overpowering. For beverage pairings, a fruity sparkling drink, or even a smooth cup of tea, can balance the sweetness while highlighting the cake’s flavor layers.
Creative Ways to Present
Presentation is half the fun with the Rainbow Drip Cake Magic Recipe. Serve it on a clean white platter for maximum color pop or place it atop a rotating cake stand so guests can admire the rainbow from every angle. Layered slices revealed on every cut provide a delightful surprise. For themed parties, coordinate tableware and decorations to match the cake’s vibrant spectrum for a cohesive, celebratory feel.
Make Ahead and Storage
Storing Leftovers
If you have leftovers (which is rare because this cake disappears fast!), store them covered tightly in the refrigerator. The buttercream acts as a great seal to keep the cakes moist and fresh for up to 4 days. Remember to bring slices to room temperature before enjoying for the best flavor and texture.
Freezing
This Rainbow Drip Cake Magic Recipe freezes wonderfully! Wrap the whole cake or individual slices tightly in plastic wrap and then foil to prevent freezer burn. Frozen, the cake keeps well for up to a month. Defrost overnight in the fridge and finish with fresh decorations or glaze if needed.
Reheating
Buttercream cakes don’t need traditional reheating, but letting refrigerated or thawed slices sit at room temperature for 20–30 minutes will revive their softness and bring out their vibrant flavors. Avoid microwaving as it can melt the frosting and alter the cake’s texture.
FAQs
Can I use liquid food coloring instead of gel?
While liquid food coloring is an option, gel coloring is best for the Rainbow Drip Cake Magic Recipe because it delivers bright colors without thinning the batter, maintaining the cake’s perfect texture.
What if I don’t have six cake pans?
No worries! Bake the layers in batches using fewer pans and allow each set to cool completely before making the others. Patience here will not compromise the magic!
Can I make this recipe gluten-free?
Substituting with a gluten-free flour blend designed for baking can work well, but results may vary slightly in texture. It’s worth experimenting if you need a gluten-free version of the Rainbow Drip Cake Magic Recipe.
How important is chilling before adding the drip glaze?
Chilling is key to the signature look. A well-chilled cake helps the glaze set quickly without sliding all over, creating those perfect drips that give this recipe its magical visual appeal.
Can I use other frostings besides vanilla buttercream?
You absolutely can! Cream cheese frosting or Swiss meringue buttercream can be delicious alternatives, though the classic vanilla buttercream paired with the colorful layers is a big part of the charm in the Rainbow Drip Cake Magic Recipe.
Final Thoughts
Making the Rainbow Drip Cake Magic Recipe is truly a joyful baking adventure filled with color, flavor, and a whole lot of fun. It’s the kind of cake that not only tastes incredible but creates unforgettable memories as you build it layer by vibrant layer. Whether you’re treating yourself or celebrating with loved ones, I encourage you to dive in and bring a little magic and rainbow to your kitchen soon!
Print
Rainbow Drip Cake Magic Recipe
- Prep Time: 45 minutes
- Cook Time: 18 minutes per batch
- Total Time: 2 hours plus chilling
- Yield: 12 servings
- Category: Dessert
- Method: Baking
- Cuisine: American
- Diet: Vegetarian
Description
Rainbow Drip Cake Magic is a stunning, colorful layered cake featuring six vibrant rainbow layers stacked with creamy vanilla buttercream and finished with a glossy white chocolate drip glaze. Perfect for celebrations, this American dessert blends classic baking techniques with eye-catching colors and a rich, smooth buttercream frosting. The delicate cake layers are moist and tender, enhanced by the sweet vanilla buttercream, while the white chocolate drip adds an elegant touch of magic.
Ingredients
For the rainbow cake layers:
- 3 cups all-purpose flour
- 1 tablespoon baking powder
- 1/2 teaspoon salt
- 1 cup unsalted butter, softened
- 2 cups granulated sugar
- 5 large egg whites, room temperature
- 2 teaspoons vanilla extract
- 1 1/4 cups whole milk
- Gel food coloring: red, orange, yellow, green, blue, purple
For the vanilla buttercream:
- 1 1/2 cups unsalted butter, softened
- 5 cups powdered sugar
- 2 teaspoons vanilla extract
- 3–4 tablespoons milk or heavy cream
- Pinch of salt
For the drip glaze:
- 1/2 cup white chocolate chips
- 1/4 cup heavy cream
- Gel food coloring of choice
Instructions
- Make the rainbow cake layers: Preheat the oven to 350°F (175°C) and grease and line six 6-inch round cake pans, or plan to bake the layers in batches. In a medium bowl, whisk together the all-purpose flour, baking powder, and salt to combine. In a large mixing bowl, cream the softened butter and granulated sugar until light and fluffy. Add the egg whites and vanilla extract, beating until the mixture is smooth and well combined. Alternately add the flour mixture and whole milk into the butter mixture, starting and ending with the flour mixture, and mix only until just combined to keep the batter tender. Divide the batter evenly into six bowls and tint each with a different gel food coloring to create vibrant rainbow layers. Pour each colored batter into the prepared cake pans and bake for 15–18 minutes or until a toothpick inserted in the center comes out clean. Once baked, allow the cakes to cool completely before assembling.
- Make the buttercream: In a clean bowl, beat the softened butter until smooth and creamy using a hand mixer or stand mixer. Gradually add powdered sugar, mixing continuously to incorporate and avoid lumps. Once fully combined, stir in the vanilla extract, a pinch of salt, and 3 to 4 tablespoons of milk or heavy cream to achieve a fluffy, spreadable consistency. Beat the buttercream until light and airy for the best texture.
- Assemble the cake: If necessary, level the cooled cake layers using a serrated knife to ensure even stacking. Begin stacking the layers in order of the rainbow colors, spreading a generous layer of buttercream between each layer for stability and flavor. After stacking all layers, apply a thin crumb coat of buttercream over the entire cake to seal in crumbs. Chill the cake in the refrigerator for about 20 minutes to set the crumb coat before applying a smooth, final layer of buttercream for a clean finish.
- Make the drip glaze: Heat the heavy cream in a small saucepan or microwave until just steaming, then immediately pour it over the white chocolate chips in a heatproof bowl. Let the mixture sit for 1 to 2 minutes to soften the chocolate, then stir gently until smooth and glossy. Tint the glaze with your choice of gel food coloring for a colorful effect. Allow the glaze to cool slightly until it thickens but is still pourable. Using a spoon or a squeeze bottle, carefully drip the glaze over the edges of the chilled cake, allowing it to cascade down the sides.
- Decorate the cake: Finish by decorating the top with swirls of vanilla buttercream, sprinkles, or edible glitter to add extra festive and magical touches that enhance the rainbow drip cake’s celebration-worthy appearance.
Notes
- Use gel food coloring for vibrant cake layers without thinning the batter.
- Chill the cake well before applying the drip glaze to ensure the drip sets perfectly.
- Make sure cake layers are fully cooled before stacking and frosting to prevent melting or sliding layers.
- For even layers, consider weighing the batter portions before dividing.
- Adjust milk or heavy cream in the buttercream for your preferred frosting consistency.