
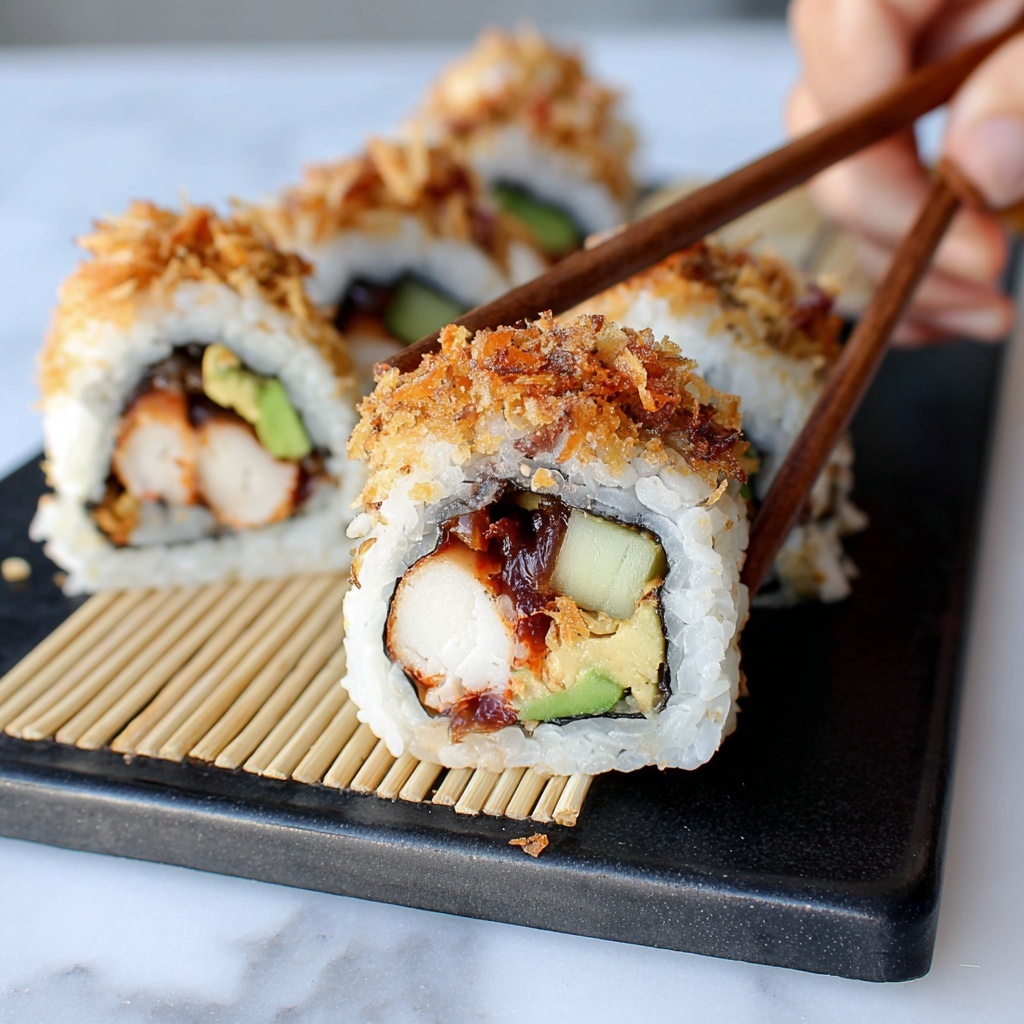
If you love sushi but want to elevate your homemade rolls with an irresistible texture, the Crunchy Salmon Roll Recipe is your new best friend in the kitchen. This sensational dish combines tender, flavorful salmon with creamy avocado and a delightful crunch from crispy panko breadcrumbs, all wrapped in perfectly seasoned sushi rice and nori. It’s an impressive yet approachable recipe that brings vibrant colors, varied textures, and mouthwatering flavors to your table, guaranteed to impress both sushi lovers and newcomers alike.
Ingredients You’ll Need
Gathering these simple yet essential ingredients is the first step to creating your own Crunchy Salmon Roll Recipe at home. Each element adds its own magic, whether it’s the creaminess, the crunch, or the classic sushi flavors.
- 1 cup sushi rice (cooked and seasoned): The foundation that provides the perfect sticky, slightly sweet base to hold everything together.
- 1 sheet nori (seaweed): Adds a subtle umami flavor and a delicate, slightly crispy texture when rolled.
- 2 oz cooked or raw sushi-grade salmon (sliced into strips): The star protein that delivers rich, fresh taste and smooth texture.
- 1 tablespoon cream cheese (optional): Offers a luscious, velvety contrast to the fish and veggies, making every bite satisfyingly creamy.
- ¼ avocado (sliced): Brings buttery softness and vibrant color that pairs beautifully with salmon.
- 2 tablespoons crispy panko breadcrumbs: The secret ingredient responsible for the signature crunch that transforms this roll.
- 1 teaspoon sesame seeds (optional): Adds a tiny nutty pop and a lovely visual finish.
- Soy sauce, spicy mayo, or eel sauce for serving: Perfect dipping companions that bring extra layers of flavor to your roll.
How to Make Crunchy Salmon Roll Recipe
Step 1: Prepare Your Workspace and Nori
Start by laying a bamboo sushi mat on a clean, flat surface, then cover it with plastic wrap to prevent sticking. Place your nori sheet shiny side down on the mat. Preparing this base carefully ensures an easy rolling process and a neat final appearance.
Step 2: Spread the Sushi Rice
With your fingers wet to keep the rice from sticking, spread a thin, even layer of seasoned sushi rice over the entire nori sheet, except for a half-inch border at the top. This step requires a gentle touch to create a layer that’s spread just right—thin enough to roll tightly but thick enough to hold the fillings well.
Step 3: Add Delicious Fillings
Arrange your salmon strips, optional cream cheese, and avocado slices horizontally across the center of the rice-covered nori. Layering these ingredients thoughtfully helps balance flavors and ensures every bite includes that luxurious mix of textures and tastes.
Step 4: Roll the Sushi Tight
Using the bamboo mat, roll the sushi tightly from the bottom edge, pressing gently as you go to seal the roll. Moisten the bare top edge of the nori slightly to help close and secure it. This rolling technique is key to achieving the perfect sushi cylinder.
Step 5: Coat the Roll with Crispy Panko
Lightly brush the outside of your finished roll with water or mayo, then roll it in crispy panko breadcrumbs until evenly coated. This is the essential crunch factor that makes this roll stand out from your typical sushi experience.
Step 6: Slice and Garnish
With a sharp knife dipped in water, slice your roll into 6 to 8 bite-sized pieces. Sprinkle sesame seeds over the top for a delicate finishing touch that adds both color and a subtle nutty flavor.
How to Serve Crunchy Salmon Roll Recipe

Garnishes
Finishing your Crunchy Salmon Roll Recipe with a sprinkle of toasted sesame seeds or a drizzle of spicy mayo boosts the flavor visually and taste-wise. Adding a little pickled ginger and wasabi on the side can awaken your palate and add authenticity to your sushi experience.
Side Dishes
Complement your crunchy roll with light, fresh sides like a crisp cucumber salad, seaweed salad, or miso soup. These dishes keep the meal balanced and refresh your taste buds between rich bites of salmon and creamy avocado.
Creative Ways to Present
For gatherings, arrange your Crunchy Salmon Roll Recipe on a bamboo sushi board with colorful edible flowers or shredded daikon radish. You can also serve each piece topped with a sliver of jalapeño or a dot of spicy sauce to add a playful kick and visual flair.
Make Ahead and Storage
Storing Leftovers
If you have any leftover sushi, store it wrapped tightly in plastic wrap inside an airtight container in the refrigerator. Best eaten within 24 hours for optimum freshness and texture, as the rice tends to dry out and the crunchiness will diminish over time.
Freezing
Freezing sushi rolls, especially those with creamy and crispy elements like panko, is not recommended. The texture and taste will be compromised significantly upon thawing, so plan to enjoy your Crunchy Salmon Roll Recipe fresh.
Reheating
Since sushi is traditionally served cold or at room temperature, reheating is not advised. If you prefer, briefly warming the salmon separately before rolling is an option, but otherwise, this is one dish best enjoyed fresh and chilled.
FAQs
Can I use raw salmon for the Crunchy Salmon Roll Recipe?
Absolutely! Using fresh, sushi-grade raw salmon is perfect and adds an authentic flavor. Just be sure it’s handled safely and kept cold before rolling.
How can I make my sushi rice sticky enough for rolling?
Cook sushi rice according to package instructions, then season it with a mix of rice vinegar, sugar, and salt while it’s still warm. Folding gently helps keep the grains intact yet sticky enough to hold together.
Is cream cheese necessary in this recipe?
Cream cheese is optional and adds a creamy texture that pairs well with salmon, but if you prefer a lighter roll or have dietary restrictions, you can easily omit it without losing the essence of the Crunchy Salmon Roll Recipe.
Can I add extra vegetables to the roll?
Definitely! Thin slices of cucumber, carrots, or even tempura flakes can add wonderful crunch and freshness, making the roll even more delightful and personalized.
What dipping sauces work best with this sushi roll?
Soy sauce is classic, but spicy mayo or eel sauce offers sweet and creamy contrasts that elevate the overall flavor. Feel free to mix and match based on your taste preferences!
Final Thoughts
Making the Crunchy Salmon Roll Recipe at home is one of those joyful kitchen adventures that brings the best of sushi right to your dining table. With simple ingredients, easy steps, and that unmistakable crunchy finish, you’re set to impress yourself and anyone lucky enough to share this vibrant dish. Give it a try and savor every delicious, crunchy bite!
Print
Crunchy Salmon Roll Recipe
- Prep Time: 20 minutes
- Cook Time: 0 minutes
- Total Time: 20 minutes
- Yield: 1 roll (6–8 pieces)
- Category: Appetizer
- Method: No-Cook
- Cuisine: Japanese-Inspired
- Diet: Pescatarian
Description
This Crunchy Salmon Roll is a delightful homemade sushi recipe combining tender sushi-grade salmon, creamy avocado, and a crispy panko breadcrumb coating for an irresistible texture contrast. Perfect as an appetizer or main course, it features a no-cook preparation method that brings fresh Japanese-inspired flavors right to your table, served with savory dipping sauces like soy, spicy mayo, or eel sauce.
Ingredients
Rice and Nori
- 1 cup sushi rice (cooked and seasoned)
- 1 sheet nori (seaweed)
Filling
- 2 oz cooked or raw sushi-grade salmon (sliced into strips)
- 1 tablespoon cream cheese (optional)
- ¼ avocado (sliced)
Coating & Garnish
- 2 tablespoons crispy panko breadcrumbs
- 1 teaspoon sesame seeds (optional)
Serving
- Soy sauce, spicy mayo, or eel sauce for serving
Instructions
- Prepare the sushi mat and nori: Lay a bamboo sushi mat on a flat surface and cover it with plastic wrap to prevent sticking. Place the nori sheet shiny side down on the mat for optimal rolling.
- Spread the rice: With wet fingers to avoid sticking, spread a thin, even layer of cooked and seasoned sushi rice over the nori sheet, leaving about a ½ inch gap on the top edge to seal the roll later.
- Add the filling: Arrange strips of salmon, optional cream cheese, and sliced avocado horizontally across the center of the rice layer to assemble the filling.
- Roll the sushi: Using the bamboo mat, roll the sushi tightly starting from the edge closest to you, pressing gently but firmly to compact the roll. Moisten the bare top edge of the nori sheet with a little water to seal the roll closed.
- Apply the crispy coating: Lightly brush the outside of the roll with water or mayonnaise, then roll it in crispy panko breadcrumbs to create a crunchy outer texture.
- Slice the roll: Using a sharp knife dipped in water to prevent sticking, slice the sushi roll into 6 to 8 equal bite-sized pieces.
- Garnish and serve: Sprinkle sesame seeds on top if desired and serve immediately with your choice of soy sauce, spicy mayo, or eel sauce for dipping.
Notes
- To make your own crispy panko, toast regular breadcrumbs in a dry skillet over medium heat until golden and crunchy.
- For extra crunch and variety, add thin cucumber strips or tempura flakes inside the roll.
- If using raw salmon, ensure it is sushi-grade to minimize health risks.
- Keep your knife wet when slicing to achieve clean cuts without squishing the roll.


